.
Part 6: Web Apps
This part of the project/course was an introduction to web application penetration testing. I was not only exposed to more web app enumeration tools, but also new methods of enumeration that automate the process via shell scripting. The OWASP Top 10 list was introduced to me, and I got a chance to exploit some of the vulnerabilities in the list using the OWASP Juice Shop, a web app designed for security testing and learning, featuring a wide range of vulnerabilities commonly found in real-world applications. Along the way, I learned about the many different ways you can defend against each vulnerability in the OWASP Top 10. Ultimately, I finished this part of the project/course equipped with the knowledge, tools, and tactics to comfortably further explore web app pentesting on my own.
Introduction
This part of the project/course is an introduction to the world of web application penetration testing. It taught me more about web app enumeration and introduced me to the OWASP (Open Web Application Security Project) Top 10, a list of the ten most critical web application security risks commonly encountered by organizations. Using the OWASP Juice Shop, an intentionally vulnerable web app serving as a training and testing platform for web app pentesting, I was able perform attacks that abuse vulnerabilities in the OWASP Top 10.
Enumeration
In this part of the course, before diving into the OWASP Top 10, I was introduced to new tools and tactics to enhance my web app enumeration. Earlier in the course (back when I successfully compromised my first five machines ever), I began learning about web app enumeration and was introduced to tools such as Wappalyzer, Sublister, Httprobe, Nikto, Burp Suite, and more. This part of the course takes that a bit further.
// Assetfinder, Amass, and GoWitness
Assetfinder — is a command-line tool developed by Tomnomnom that discovers subdomains and associated assets of a target domain. It leverages various data sources, such as DNS records, certificate transparency logs, and web archives, to identify subdomains, related domains, and other assets (e.g., IP addresses, URLs) associated with the target domain.
To launch the tool, simply run: assetfinder example.com.
Using more than one subdomain hunting tool is a good idea, as it can increase the number of subdomains you find. This is because every tool works differently and has a different implementation. As such, I was introduced to another tool: The OWASP Amass.
The OWASP Amass — an open-source reconnaissance tool developed by OWASP. It is designed for discovering and mapping external assets of an organization, such as subdomains, IP addresses, and associated network infrastructure.
To find subdomains with Amass, you simply run amass emum -d example.com.
The subdomains you find with these two tools can then be tested to see if they are alive or not using Httprobe.
What if there are lots of subdomains you found that are alive and you wanted to check them out on a web browser? For each subdomain, are you going to open up your browser, manually type these subdomains into the navigation bar, and hit enter? No, that would be inefficient. What if there was a tool that could automatically give you a folder containing a screenshot of every subdomain, as it appears on a browser? Luckily for us, such tools exist.
GoWitness — given one or multiple URLs, this tool takes screenshots of webpages, outputting the screenshots in a folder. This lets you quickly and easily see the page at everysubdomain without having to manually navigate to each one yourself.
Here is one example GoWitness command: gowitness single https://example.com.
// Automation
Let’s recap how these tools can be used in sequence. First, you can start out by running AssetFinder. By default, Assetfinder returns not only subdomains, but also extra domains related to the target domain. These extra results that aren’t of interest to us can be filtered out. As mentioned early, you want to run more than one subdomain hunting tool to increase the number of subdomains you find, so you’ll probably also want to run a tool like Amass. Then, using a tool like Httprobe, subdomains you find must then be tested to see if they’re alive. If you have many alive subdomains to check out on a browser, you can then run these subdomains through a tool like Gowitness.
This entire process, plus more, can be automated into a single shell script to make our lives easier. That’s exactly what I learned how to do in this course.
Let’s look at how this automation can be done:
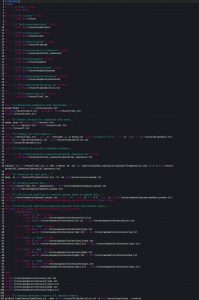
This script, originally written by Gr1mmie and modified by TCM Security, is just one example of how the web app enumeration process can be automated. When it is run, this script takes a domain name as argument and stores it in the url variable. Lines 3-35 make sure all required directories required to run the script are in place. Subdomains are then: hunted using Assetfinder and Amass, filtered to only include relevant domains without duplicates, run through Httprobe, scanned for subdomain takeover attacks, run through nmap, run through a tool that uses the Wayback Machine to scrape data from older versions of the webpage, and run through EyeWitness (a tool similar to GoWitness). All along the way, the script filters subdomains and data to show you relevant findings.
Now that I understand how every single in this script works, I can’t wait to eventually write my own!
The OWASP Top 10
As previously mentioned, this part of the course is a mere introduction to web app pentesting, since a whole full dedicated course would be required to go into full detail on all aspects of the topic. In fact, TCM Security does have a full course dedicated just to web app pentesting, which I plan on taking. Nonetheless, this part of the course equipped me with the tools, tactics, and thought processes that I need to comfortably explore web app pentesting on my own, which I also plan on doing. Web app pentesting is introduced here via the OWASP Top 10.
The OWASP (Open Web Application Security Project) Top 10 is a list of the ten most critical web application security risks commonly encountered by organizations. This course covers the OWASP Top 10 at a high level, while also including hands-on experience on how to exploit some of the vulnerabilities in the list. I did the hands-on portion by exploiting the OWASP Juice Shop, an intentionally vulnerable web app serving as a training and testing platform for web app pentesting. The Juice Shop has many vulnerabilities, but this course does walkthroughs for a few of them. However, these few walkthroughs are just enough for me to feel comfortably tackling the other vulnerabilities on my own, which I’ll definitely be doing.
The OWASP updates the list every few years. Due to the fact that this course was released around 2020, the contents in this part of the course still refer to the OWASP Top 10 as it was at the time. In 2021, the OWASP Top 10 was updated; as such, the content that I will lay out here will refer to the previous version OWASP Top 10. However, much of the content between the old and new OWASP Top 10 is still the same. The new version simply renames and reorders the previous vulnerabilities, while adding a few new ones. The team at TCM Security has said that they are working on updating this web app part of the course to reflect the new updated OWASP Top 10 list. Once they finish that, I will be sure to review this part of the course again. In the meantime, since I’ve now completed the full course, I will take it upon myself to review the new OWASP Top 10 list, understand it, try to get some hands-on experience with the new vulnerabilities, and learn how to defend against them.
// The OWASP Testing Checklist + Testing Guide
Apart from the OWASP Top 10, the OWASP also provides a comprehensive web app pentesting guide that goes beyond just the top 10 vulnerabilities. There also exists an excel testing checklist made by tanprathan that helps make sure you’ve left no stone unturned in the OWASP guide. This checklist contains more than 150+ tests. The best part is that the checklist contains a reference that lets you easily identify where in the OWASP guide you can find the next item to be tested. This is helpful because within the OWASP guide, you can then find more information on how to test against the next item in the list.
The checklist and the OWASP guide are a powerful combo that I look forward to using in my first assessment.
// The OWASP Juice Shop
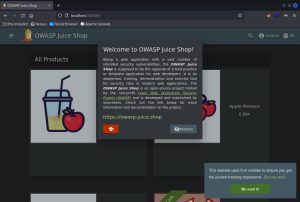
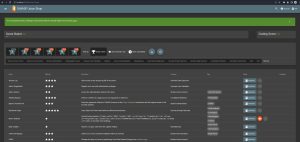
As previously mentioned, the OWASP Juice shop is an intentionally vulnerable web app serving as a training and testing platform for web app pentesting. It has a score board of varying web app pentesting challenges, with different levels of difficulty, for you to complete. This score board is complemented by a guide that has detailed information on all challenges and their solutions. The Juice Shop is a great learning source for web app pentesting beginners.
This part of the course will only do certain challenges that are based on the OWASP Top 10, so many challenges will be left untouched. However, the course equips you with everything you need to tackle all challenges on your own, which I plan on doing. If I can’t solve a certain challenge, I will just refer to the Juice Shop guide to learn how to complete it.
// Burp Suite


This part of the course extensively uses Burp Suite, which I learned how to use earlier in the course. As shown above, simply navigating around Juice Shop and clicking around the website will populate Burp Suite’s site map, which can contain valuable enumeration information.
Burp Suite’x proxy, repeater, and intruder functions are also immensely helpful. As a quick recap: the proxy function captures and holds HTTP traffic, repeater takes this traffic and lets you repeatedly modify and send it off to see how a web app responds, and intruder serves as an engagement tool that can perform automated attacks (e.g., brute forcing a login page) using your own payloads.
There’s also an app store within Burp Suite that can extend its functionality:
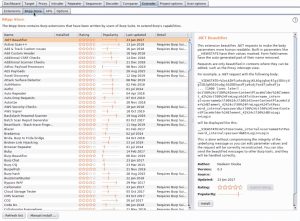
Burp Suite has many other functions/features, such as a sequencer, decoder, comparer, and much more!
The Pro edition of Burp Suite is packed with even more features, such as scanners and other engagement tools. It’s important to note that although scanners can be useful, one shouldn’t solo rely on them. Much manual testing needs to also be done alongside automatic scanning in order to really make sure you’re finding as much vulnerabilities as possible on a web app.
// SQL Injection
What is a SQL injection? It’s an attack in which malicious SQL statements are injected into a SQL database. This is typically done via some kind of user input mechanism, like a form on a website. If successful, a SQL injection can let an attacker read sensitive databases, exfiltrate data, modify databases, and even possibly pop a shell.
To see this attack in action, we first need to boot up Burp Suite, turn on its proxy function, navigate to the Juice Shop login page, and use any fake made-up credential to login. For this demonstration, the fake made-up credential I used was fake_email@email.com:fake_password. The proxy will then capture this login request, which we will then send to Burp Suite’s repeater.
Let’s see what that look like in Burp Suite:

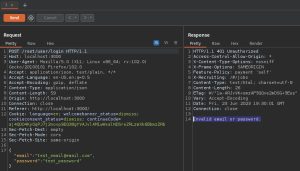
As you can see, we can’t login with the made-up credentials (as expected), as shown by the Invalid email or password response above in the repeater.
Before proceeding with the attack, we have to understand what’s going on behind the scenes in the web app’s database when we send over a login request. First, you send over your input (in this case, a username and password). SQL then takes your input and uses a command like this to check if the credentials you supplied are valid: SELECT * FROM Users WHERE email='test_email@email.com' AND password='test_password';. This command selects everything (*) in the Users table and selects the user that has the credential you supplied. In the SQL command, the username and password you provided are enclosed in single quotes and used as a value in the “email” and “password” attributes.
Now, let’s see what happens if we send over the same username, but with an extra single quote appended to the end: test_email@email.com'.

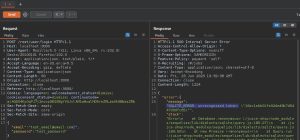
As you can see, Burp Suite’s repeater shows a SQLITE_ERROR thrown in response to this username with an appended single quote. This is a big sign that this web app is vulnerable to a SQL injection attack. This error is thrown because when we send over the username with a single quote appended to the end, the SQL statement behind the scenes turns into this: SELECT * FROM Users WHERE email='test_email@email.com'' <rest of SQL command>;. The extra single quote in the username results in a stand-alone single quote in the SQL command. This stand-alone single quote results in an error because SQL expects all single quotes to have another matching single quote.
So now, how can we get malicious? Let’s do that by sending over the username of test_username@email.com' OR 1=1; --. This username input will be processed like this in the backend: SELECT * FROM Users WHERE email='test_email@email.com' OR 1=1; -- <rest of sequel command>. This username input results in the made-up email being enclosed in single quotes, followed by the true statement that 1=1. The semicolon ends the statement, while the — is used to comment out the rest of the SQL command. This results in the command selecting everything in the Users table, then checking if (any user contains the email address of test_email@email.com) OR (1=1), while ignoring the rest of the commented-out SQL statement. This results in the SQL statement always being true. Ultimately, the SQL command searches through the database and selects the first user, which is typically the administrator. As such, when supplying this malicious username, along with any made-up password, we will be able to login as admin.
Let’s see this in action:
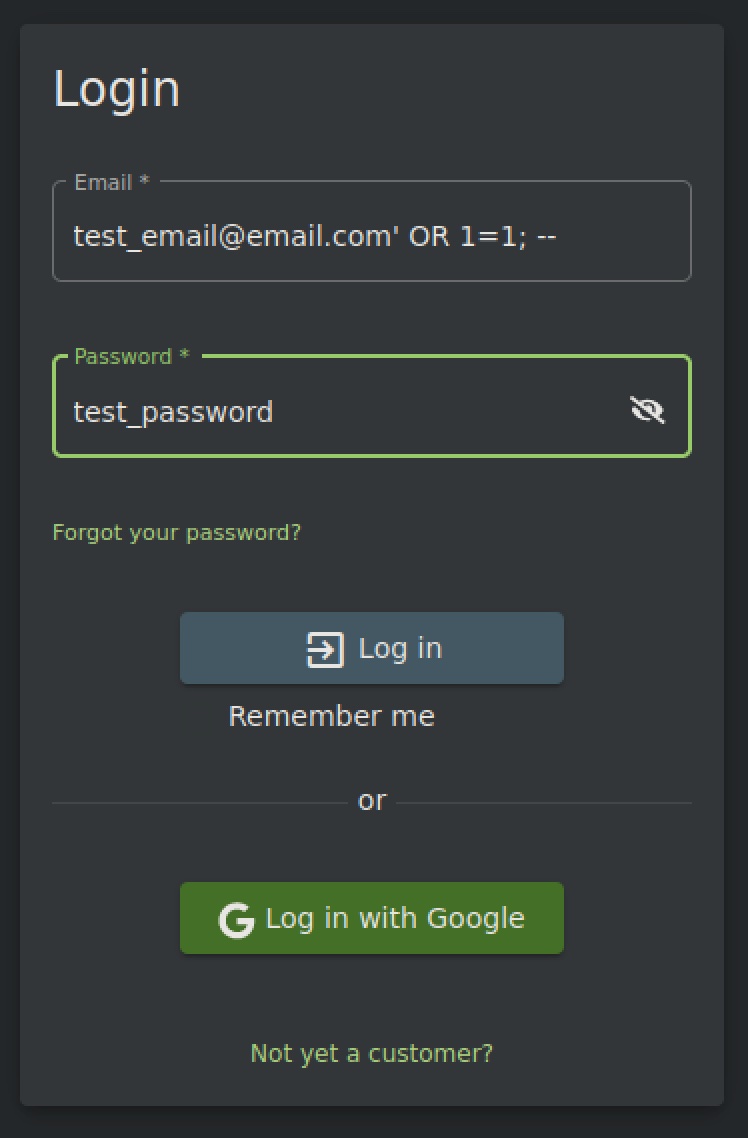
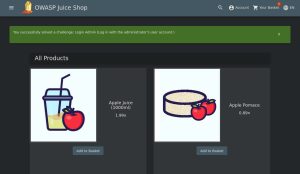
We’ve now successfully logged in as the admin using a SQL injection.
The fact that we were shown an error when testing for SQL injections was convenient in this case, but this may not always be the case — even if a web app is vulnerable to SQL injection. In such case, where no error messages are thrown during SQL injection testing, assuming the web app is vulnerable to the attack, this would be called a blind SQL injection. If you can’t see any error messages, how are you supposed to confirm if the web app you’re testing is vulnerable? There is a solution for this: injecting SQL sleep commands. If you inject sleep commands and they all seem to work, then this is a sign that the web app is processing your SQL commands, meaning it’s vulnerable to SQL injections.
// SQL Injection — Defense
Although there are more than 2 defenses against SQL injections, the two main ones that directly address the vulnerability are: parameterized statements/queries, which prevent the attack altogether, and input validation/sanitation, which ensures no malicious input characters can be used (such as single quotes).
// Broken Authentication
Broken authentication vulnerabilities are flaws that enable unauthorized access to user accounts, session IDs, or other authentication mechanisms. Basically, broken authentication vulnerabilities are any weaknesses in the authentication process. There’s a big bucket of things that can fall under broken authentication. For example, a web app is considered to have broken authentication vulnerabilities if: it permits automated attacks (e.g., brute forcing, credential stuffing) without restrictions, it uses default/weak passwords, it uses weak or ineffective credential recovery/forgotten password processes (such as “knowledge-based answers”), it has no multi-factor authentication (MFA), etc.
Let’s find one broken authentication example in Juice Shop by navigating to its “forgot password” page:
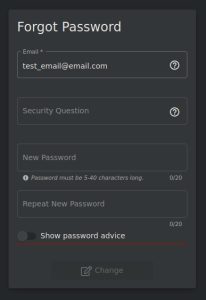
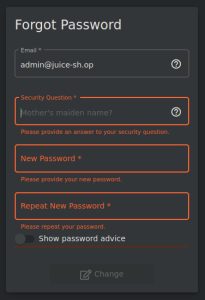
As you can see, the page allows for the enumeration of usernames by only allowing input in the rest of the fields when a valid username is supplied. This allows us to not only confirm a username, but also its matching security question, the answer of which can possibly be guessed (i.e., the answer might be the same as the user’s last name) or found after some open source intelligence reconnaissance. This type of username enumeration can also assist in brute force attacks.
Another thing you can test for is session fixation, a vulnerability where an attacker sets for himself the session identifier (token) of another user, allowing him to hijack the session and gain unauthorized access. This can happen if, for example, a user’s token doesn’t expire upon the user logging out. You can test for this by creating a new user, logging in, turning on Burp Suite’s proxy to take note of your session token, then logging out to see if the session token is still present in Burp Suite. If the session token doesn’t expire, you will see it remaining in Burp Suite. This would possibly pose an authentication weakness because if they don’t expire, you may be able to login to a web app without knowing a credential by simply sending a request that includes a user’s token.
These are just a few ways to test for broken authentication, a category containing many different types of vulnerabilities, each with their own testing methodology.
// Broken Authentication — Defense
Broken authentication includes so many different types potential weaknesses, each with their own type of defense. For example, rate limiting (limiting the number of login requests) can be used as a defense against brute force attacks, while enabling MFA can be used as a defense in case a valid credential is captured and used by an attacker.
Other defenses include implementing strong password policies and enforcing password complexity requirements to prevent easy guessing or brute force attacks, adopting secure session management practices such as using unique session identifiers and properly invalidating sessions upon logout or session timeout, implementing account lockout mechanisms to mitigate the impact of brute force attacks, regularly monitoring and analyzing authentication logs for suspicious activities, and staying up to date with security patches and updates for the authentication mechanisms in use. By employing these various defenses, organizations can significantly enhance the security of their authentication processes and protect user accounts from unauthorized access and compromise.
// Sensitve Data Exposure
Sensitive data exposure is exactly what it sounds like: vulnerabilities that can lead to the exposure of sensitive data. This is broad category that can encompass many different vulnerabilities. A few examples of sensitive data exposure vulnerabilities include web apps that : reveal sensitive files due to directory busting, use insecure protocols with no encryption during transit (e.g., HTTP, FTP), don’t use encryption at rest, use weak cryptographic algorithms, etc.
There’s many ways you can test for sensitive data exposure. Let’s look at one way we can do this in Juice Shop:

By running a directory busting tool against Juice Shop, we come to find the /ftp directory that contains sensitive data, including a .kdbx file, which is a key storage database for your passwords.
Another way you can check for sensitive data exposure is by searching through responses in Burp Suite. Sometimes, these responses may leak sensitive information. These responses can also be checked to see if they contain all necessary secure headers such as HSTS, without which the secure HTTPS protocol can be downgraded to plaintext HTTP in a protocol downgrade attack.
You can also test for sensitive data exposure by testing a web app’s level of encryption. One way to do this is by using this Nmap command: nmap --script=ssl-enum-ciphers -p 443 example.com, which gives you a report card on the level of encryption used by a web app.
These are just a few ways to test for sensitive data exposure, a category containing many different types of vulnerabilities, each with their own testing methodology.
// Sensitive Data Exposure — Defense
Since sensitive data exposure is such a broad category, there’s many different ways to defend against it. As with everything else in cybersecurity, a multi-layered approach is essential. Organizations should implement robust encryption mechanisms for data at rest and in transit, leveraging strong algorithms and protocols. Additionally, sensitive data should be properly masked or redacted when displayed or logged, minimizing the risk of accidental exposure. Implementing strict access controls and role-based permissions also helps by restricting data access to authorized individuals, reducing the potential for unauthorized exposure. These are just a few ways to defend against sensitive data exposure — there’s plenty more.
// XML External Entities (XXE)
An XML external entity (XXE) attack abuses systems that parse XML input. The attack takes advantage of XML external entities, which are kind of like variables that can hold and output the contents of any file on the web app’s host system. XXE attacks can result in denial of service, local file disclosure, remote code execution, and more.
Since I am using Docker to boot up Juice Shop, I cannot perform this attack against it. However, let’s pretend that we could. Here’s one way we could do it:
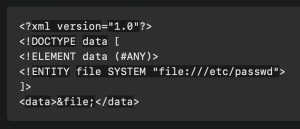
The XXE payload (an XML file) we would use is shown above. This payload can then be, for example, uploaded via a page on the web app that accepts uploads.
Let’s break down the payload line by line. The first line simply specifies the XML version used in the document. The second line defines the document type declaration (DTD) for the “data” element. The third line specifies that the “data” element can contain any content. The fourth line declares an external entity named “file” that references the “/etc/passwd” file on the local system using the “SYSTEM” entity type. By referencing this file, the external entity takes on the contents of the file. Lastly, the last line references the “file” entity within the “data” element. This last line effectively inserts the contents of the sensitive “/etc/passwd” file into the XML document at that location.
This payload needs to be uploaded somewhere within the web app, so the next step would be to register as a new user on Juice Shop and look around the website to see if any page gives us the option to upload files. For example, this is where would upload the payload on Juice Shop:
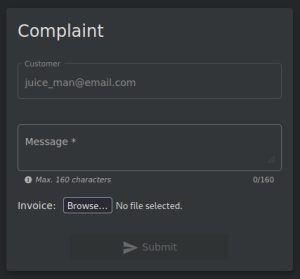
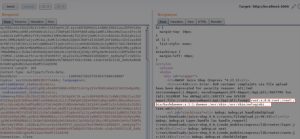
After uploading the payload, we would see the contents of /etc/passwd dumped as a response in Burp Suite.
// XXE — Defense
The main thing you can do to defend against XXE attacks is to disable external entities in XML parsers. You can also implement input validation and sanitization techniques to filter out untrusted or malicious input, especially when processing XML content. There are secure XML parsing libraries that you can use that provide provide built-in protection against XXE attacks. These XML processing libraries should be regularly updated and patched with the latest security fixes/enhancements. By combining measures like these, you can mitigate the risk of XXE attacks and ensure the integrity and security of XML parsing within your applications.
// Broken Access Control
Broken access control is a broad category of vulnerabilities characterized by security flaws that permit unauthorized users to access or perform actions beyond their intended privileges. An example of broken access control include a regular user being able to modify a URL to see an admin panel or another regular user’s information.
Let’s see an example of broken access control in Juice Shop:
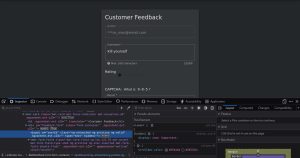
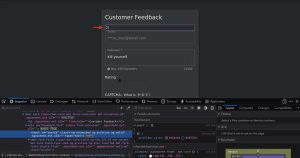
If we navigate to the customer feedback page and hit “inspect element”, we will find a hidden input element. By deleting the “hidden” attribute in the element, we reveal it, showing us that this element contains our user ID. Since we can modify this value, this allows us to post feedback as another user. Usually, user ID #1 is the administrator. Let’s post this very inappropriate feedback as the administrator by changing the value of this input field to 1:


As you can see, the green confirmation message shows we successfully posted feedback as another user — a form of broken access control.
// Broken Access Control — Defense
Defending against broken access control involves implementing a robust access control mechanism that enforces proper authorization rules and restrictions based on user roles and privileges, conducting thorough testing to ensure that access controls are correctly implemented and enforced at every level, regularly reviewing and auditing access control configurations to identify and address any misconfigurations or gaps, and employing secure session management techniques to prevent session-related vulnerabilities that could lead to unauthorized access. By adhering to practices like these, you can strengthen your access control defenses and protect against potential exploits related to broken access control.
// Security Misconfigurations
The name of this category of vulnerabilities is pretty self-explanatory — security misconfigurations are exactly what they sound like. It’s a big catch-all term encompassing many vulnerabilities. Examples include using: default accounts, default credentials, unnecessary software, deprecated software, no input validation/sanitation, unnecessary ports, etc.
// Security Misconfigurations — Defense
To defend against security misconfigurations, start by following secure configuration guidelines for all components, frameworks, and platforms used in your application. Regularly update and patch software to ensure you have the latest security fixes. Conduct regular security assessments and audits to identify and address misconfigurations, and use automated tools to assist in identifying common misconfigurations across your infrastructure. By implementing these measures, you can minimize the risk of security misconfigurations and enhance the overall security posture of your application.
// Cross-Site Scripting (XSS)
Cross-site scripting is the ability to inject and execute malicious scripts into web applications, potentially leading to the theft of user data and other unauthorized actions such as key logging, denial of service, and the defacing of webpages.
There are three types of XSS:
- Reflected XSS: Occurs when the malicious script is embedded in a URL and reflected back to the user by the vulnerable website.
- Stored XSS: Involves the insertion of a malicious script into a database or storage system, which is then retrieved and displayed to other users every time they visit the webpage containing the malicious script.
- DOM-based XSS: Relies on client-side JavaScript manipulating the Document Object Model (DOM) to inject and execute malicious scripts on the user’s browser.
Let’s see how this attack works:
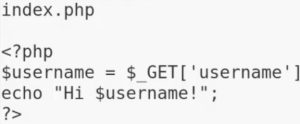
Suppose the PHP file above is used by a page, which takes your input via a form and stores it in the $username variable. In this example, if I submit the form with my name as the input, the page will output Hi Carlos!. What if I change my input to <script>alert(1)</script>? If a web app is vulnerable to XSS, the page will show a pop-up with the number 1 as an output. You can think of this pop-up as a malicious payload, since an attacker would substitute a malicious payload for the pop-up.
In the simple example above, reflected XSS would show you the pop-up message only after submitting the input form. This means if you trigger the pop-up and then leave the webpage and come back, the pop-up would not show up unless you manually trigger it again. However, if the page instead stored your input server-side, then you would see this pop-up every time you exit the page and come back to it — which would be an example of stored XSS. Stored XSS can happen if, for example, an attacker posts a comment containing the XSS payload on a blog where anyone can see the comments. In this case, the web app would store the comment (the malicious payload) server-side and execute it every time someone visited the page.
Tinkering with forms is just one way of testing for XSS. Another way could be by tinkering with the URL of a webpage. Imagine a webpage’s URL contains index.php?username=Carlos. You can test for XSS by replacing the username value with a script: index.php?username=<script>alert(1)</script>.
Both reflective and DOM XSS require a user to click on a malicious link.
Let’s see an example of reflected and stored XSS, starting with the former:
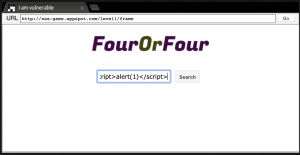
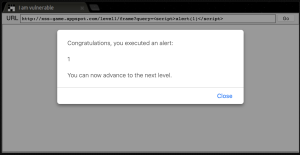
For this simple example of reflected XSS, I used this website that lets you practice XSS. By inputting <script>alert(1)</script> into the search bar and hitting enter, we get a pop-up confirming that the reflected XSS payload was successfully executed.
Now let’s see an example of stored XSS in Juice Shop:


Here in my user profile page on Juice Shop, I tried submitting <script>alert(1)</script> into the username field, but certain parts of the payload were filtered out after submission. We can get around this by modifying the payload. What do we modify it to? Well, let’s think about it: it seems like <script>a was filtered out. What if we can get around this filter by modifying the payload to <<script>ascript>alert(1)</script>, which would filter the modified payload back to <script>alert(1)</script>. Let’s try it and see if it works:

After submitting the modified stored XSS payload, we get a pop-up confirming that the payload works. Now that we’ve set our username to this XSS payload, it will trigger every time we visit this page.
You can automate the XSS testing process by using tools like Burp Suite. For example, you can take a request captured by Burp Suite’s proxy, send it to intruder, and use a list of XSS payloads (which you can Google) to attack an input field.
// XSS — Defense
To defend against XSS, you can implement input sanitation methods such as: encoding, filtering, and input validation. Additionally, you can also use the httponly flag in cookies to indicate that cookies should only be accessible through HTTP requests and are not accessible to client-side scripts. This flag prevents client-side scripts from accessing the cookie’s value, thereby enhancing the security of cookies by mitigating the risk of XSS. Some types of headers can also help mitigate XSS, too.
// Insecure Deserialization
Serialization and deserialization are processes used in web applications to convert data into a format that can be easily stored, transmitted, or reconstructed.
Serialization involves converting an object or data structure into a byte stream or string format. This allows the data to be stored in a file or transmitted over a network. The serialized data typically includes the object’s properties and their values, preserving the object’s state.
Deserialization, on the other hand, is the process of reconstructing the object or data structure from the serialized form. It involves taking the serialized data and converting it back into an object that can be manipulated and used within the application.
A simple example use case is a web application that allows users to save their preferences. When a user sets their preferences, such as language selection and theme preference, the application serializes these preferences into a structured format (e.g., JSON, XML, YML, or binary) and stores it in a file or database.
Later, when the user visits the application again, the stored preferences are retrieved from storage, deserialized, and reconstructed into an object. The application then uses this deserialized object to apply the user’s saved preferences, ensuring the application displays the appropriate language and theme for a personalized experience.
Serialization and deserialization play a crucial role in persisting data, transmitting it across network boundaries, and maintaining state in web applications, allowing for the seamless storage and retrieval of complex data structures.
An insecure deserialization attack takes advantage of these processes by serializing a payload and sending it to the web app, which then deserializes and executes it.
Unfortunately, there is no way for me to demonstrate this attack in Juice Shop, but I will definitely be looking into ways I can practice this exploit on other platforms.
// Insecure Deserialization — Defense
Defending against insecure deserialization attacks requires a combination of preventive and detective measures. Organizations can start by ensuring that only trusted and authorized serialized data is accepted by implementing input validation and integrity checks. Secure deserialization libraries or frameworks that have built-in safeguards against deserialization vulnerabilities can also be used. Implementing strict access controls and least privilege principles can limit the impact of potential deserialization exploits. Regularly updating and patching software dependencies is also very important. Finally, organizations should monitor and log deserialization activities to detect any suspicious or abnormal behavior. Such multifaceted defensive approach can mitigate the risk of insecure deserialization attacks.
// Using Components with Known Vulnerabilities
This category of vulnerabilities is self-explanatory. Any insecure component used by a web app is a security vulnerability. Tools like Burp Suite and Nessus can scan for these components. Finding these components boils down to good enumeration.
// Using Components with Known Vulnerabilities — Defense
The best defense against components with known vulnerabilities is to patch the components or not use them at all. If no patch is available for an outdated component, organizations should consider using a more secure component.
// Insufficient Logging and Monitoring
The name of this category of vulnerabilities is also pretty self-explanatory. Not logging and monitoring your web app is a security vulnerability because it hampers the ability to detect and respond to security incidents, identify suspicious activities or unauthorized access attempts, and gather valuable forensic evidence in the event of a breach, leaving your application susceptible to undetected malicious activities and hindering effective incident response and remediation.
You shouldn’t be able to go by undetected if you’re constantly scanning and brute forcing a web app.
// Insufficient Logging and Monitoring – Defense
By implementing logging and monitoring mechanisms, a web app can enhance its cybersecurity by capturing and analyzing critical information about system activities, user interactions, and security events. Through comprehensive logging, the app can maintain an audit trail, aiding in incident investigations, compliance, and forensic analysis. Real-time monitoring enables the detection of suspicious activities, abnormal behavior, or potential attacks, allowing for timely response and mitigation. By leveraging the insights provided by logging and monitoring, the app can identify vulnerabilities, track security events, and proactively strengthen its defenses, ultimately fortifying the overall cybersecurity of the web app.
{$}
<contact_me>
Fill out the form below to reach out to me!