.
Part 1: Introduction
This project/course starts off with some fundamental content: computer networking, Linux, and Python. These are essential topics that need to be understood before getting into the fun stuff. Since this part is just a brief overview of prerequisites to the project/course, I won’t go into too much detail. I already learned most of the content here from my computer science education, so this was just a quick refresher for me.
Networking Refresher
Computer networking is a fundamental topic that must be understood not just in ethical hacking, but in any computer science or IT field. Simply put, computer networking refers to how computers talk to each other. The OSI (Open Systems Interconnection) model is a conceptual framework used to standardize all communications between computers; it consists of 7 layers, each of which represents a different aspect of networking communication. By breaking down network communication into distinct layers, it allows network engineers and developers to design and implement communication protocols that are modular, efficient, and interoperable between systems.
At the data-link layer of the OSI model, we can find MAC addresses. These addresses are unique identifiers assigned to NICs (network interface controllers) on all devices. These addresses are used by switches and routers to forward data to the right destination device in a local network segment.
At the network layer of the OSI model, the layer responsible for routing data between different networks, we can find IP addresses. Within a LAN (local area network), all devices use a unique private IP address to communicate with each other. However, once any of these devices tries to reach outside the LAN and onto the internet, they will have to use a public IP address. Where do they get this public IP address? From the router in their LAN. The router is also known as the default gateway, and it uses a protocol called NAT (Network Address Translation) to convert private IP addresses to its public IP address and vice versa.
The transport layer of the OSI model is responsible for providing reliable data transfer between end-to-end network nodes, such as between two computers, while also ensuring that data is transmitted in the correct sequence and without errors. The two most important protocols in this layer are TCP (Transmission Control Protocol) and UDP (User Datagram Protocol). TCP is a reliable connection-oriented protocol that ensures data delivery by using acknowledgments and retransmissions, while UDP is a connectionless lightweight protocol that does not guarantee delivery and is commonly used for real-time applications like video streaming. When two devices communicate over TCP, they use a three-way handshake to establish a connection. The handshake starts with the sender (client) sending a SYN (synchronize) message to the receiver (server) to initiate a connection. The server responds with a SYN-ACK (synchronize-acknowledge) message to acknowledge the request and indicate its readiness to communicate. Finally, the client sends an ACK (acknowledge) message to confirm the connection has been established.
As it relates to penetration testing, understanding the TCP three-way handshake process is important if one wants to understand how network scanners work, which are heavily utilized in the field. The most popular network scanning tool, Nmap, uses what’s known as a stealth scan by default; this stealth scan uses the three-way handshake to scan hosts on a network, which is why it’s also called a SYN-ACK scan. However, stealth scans don’t actually go through the entire normal three-way handshake process. Let me explain: let’s say you run a default Nmap scan against machine A. To determine if a port is open, Nmap will first send a SYN request for that port. If it is open, machine A will send back a typical SYN-ACK response, which basically tells us “the port is open, go ahead and connect”. Great, we now know that the port is open. Since we got the information we needed, we don’t need to send back an ACK message. Instead, we send back a RST (reset) message, which basically tells machine A: “forget it, I don’t want to establish a connection”. As you can see, the normal three-way handshake process is not actually used in its entirety, and this is why stealth scans are also known as half-open scans. The SYN-ACK scan is more accurate than other TCP scans like the TCP-connect scan because it doesn’t complete a full TCP connection, which can sometimes be logged and detected by network security measures. As sneaky as the name might sound, stealth scans can still be detected by intrusion detection systems and even personal firewalls depending on how they are configured.
As a penetration tester, you will come across many common ports and protocols during assessments, including (but not limited to): 21 (FTP), 22 (SSH), 23 (Telnet), 25 (SMTP), 53 (DNS), 80/443 (HTTP/HTTPS), 110 (POP3), 143 (IMAP), 139/445 (SMB), 67-68 (DHCP), 69 (TFTP), 161 (SNMP), 111 (NFS), and more!
Subnetting is also another important topic you must know. Why? You will be working with networks, hosts, and IP addresses. If you are performing an assessment for a client, and they give you an IP address in CIDR notation to let you know which hosts on a network they want you to target, you have to know subnetting in order to understand how many hosts they want targeted. Is it 256 hosts on a /24 network? Or 8192 hosts on a /19 network? As you can see, this is important information that needs to be known.
Setting Up My Kali Linux Attack Machine
All professional penetration testers need a specialized attack machine, with a specialized operating system. Kali Linux is currently the most popular operating system for penetration testing and ethical hacking purposes. It is specifically designed for digital forensics and penetration testing, and comes pre-loaded with a wide range of tools and utilities for security testing, vulnerability scanning, and network analysis. That’s why this course requires all students to use Kali Linux in a virtualized environment to follow along and complete all labs. The labs consist of the Kali attack machine and several other virtualized victim machines. All virtual machines (the attack machine + any victim machine) are downloaded and run locally — so you can be rest assured I am not harming anyone’s computer without permission; after all, this is a course on ethical hacking.
Introduction: Linux, the Terminal, and Shell Scripting
After getting my Kali Machine set up, I learned about the Linux OS and how I can navigate and interact with it via the terminal. As you will see in later parts of this course, I have become very proficient at doing this. Becoming a proficient terminal user is just a natural byproduct of going through this course, since students basically live in the command line for much of the course. It’s been so satisfying learning the ins and outs of the terminal — once you get used to it, there’s no going back to the GUI. Plus let’s be real, it just straight up looks dope using the terminal. Here are some of the things I learned:
- How to use sudo / root
- Navigating the file system
- Users and privileges
- Common network commands
- Viewing, creating, and editing files
- Starting and stopping services/processes
- Installing and updating tools
- Shell scripting
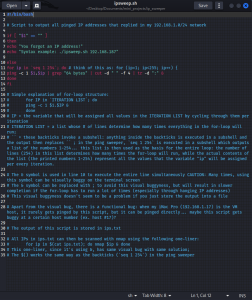
To showcase how bash scripting works, I built a simple network ping sweeper. The program sends an ICMP ping request to all hosts for any given network; the given network is specified as an argument when running the command. We’ll know if a host is up if we get a reply. It’s a very basic program, and as such it won’t work if, for example, a host has stealth mode enabled, but it was a quick and simple way of getting my hands dirty with some bash scripting for the first time while also incorporating the basic networking knowledge I learned earlier. Here is the program:

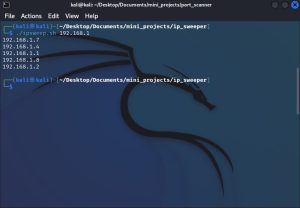
Here is an example of the program being run on my local network:

As you can see, the ping sweeper detected 5 hosts on my network. To be more specific about how the program works: it takes the first three octets of an IP address as an argument. The last octet is then iterated through by the program, in a for-loop, to ping all hosts on a network. In the source code above, you can see that the for-loop runs from 1 to 254, which pings all hosts in a /24 network. You can, of course, change this 1-254 range to whatever other range.
Introduction: Python
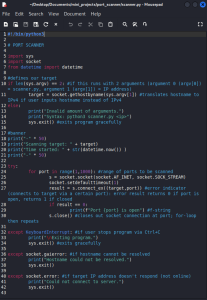
Python is a popular language among ethical hackers because it is intuitive, has an extensive standard library for networking, web scraping, and cryptography, and because of its automation capabilities. In this introductory part of the course, I learned the basics of Python. Using the skills I learned, I ended up building a basic port scanner. It takes an IP address, which will be scanned for any open ports, as an argument when it is run. It does this by using the sys and socket standard library modules. In the source code below, you will see that it scans for ports 1-999. You could change this range to include all 65,535 ports, but that would make the program run slow — which is why I am running it here with a reduced port count. Here is the program:

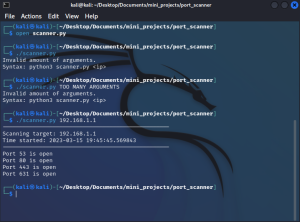
Here is an example of the program being run against my router’s private IP address:

As you can see, the scanner found that my router has 4 ports open. Additionally, I implemented input validation to ensure that the user enters only 1 argument, as well as other error handling exceptions.
{$}
<contact_me>
Fill out the form below to reach out to me!