.
Part 2: Hacking My First Machine
This is where the real fun begins! This part of the project/course covers: an introductory overview of the 5 stages of ethical hacking, OSINT (Open Source Intelligence) reconnaissance and information gathering, scanning and enumeration, and exploitation basics. By the end of this part, I successfully hack my first machine ever.
The 5 Stages of Ethical Hacking
Before I explain the five stages of ethical hacking, I will begin by defining three key terms that every cybersecurity professional should know: penetration tester, red team, and blue team. These three terms refer to roles in the cybersecurity field, each having their own distinct functions and objectives.
- Penetration tester — a penetration tester, or “pentester/pen tester” is an ethical hacker who identifies and exploits vulnerabilities in computer systems, networks, or web applications to evaluate their security. They perform simulated attacks on an organization’s systems to identify weaknesses and vulnerabilities before a malicious actor can exploit them. Penetration testers often follow a structured methodology, and their primary goal is to assess and improve the security posture of an organization.
- Red team — a group of ethical hackers within an IT/cybersecurity department that does the same things a pentester does, but with a much broader scope. Red teams aim to more accurately emulate the tactics, techniques, and procedures of real-world adversaries by not just using technical cybersecurity tools, but by also employing social engineering and physical intrusion. Red Team exercises are typically more aggressive, sophisticated, and comprehensive than standard pentesting assessments.
- Blue team — a blue team is the counterpart to the red team, responsible for defending an organization’s IT infrastructure against cyber threats. They design, implement, and monitor security measures to protect the organization’s systems, networks, and data. Their primary goal is to detect, prevent, and respond to cyberattacks. Blue Teams often work closely with other security teams within the organization, such as the Security Operations Center (SOC), to ensure a robust defense-in-depth strategy.
Collectively, the five stages of ethical hacking form a systematic process that pentesters and red teams use to identify and assess vulnerabilities in a target system.
The first stage, reconnaissance/information gathering, gathers pertinent information about the target system, much like a detective assembling a case file. The second stage, scanning and enumeration, is where you probe for any vulnerabilities the target may have, akin to an X-ray technician identifying weaknesses within a patient’s bones. Once vulnerabilities are exposed, the third stage is gaining access, which resembles a locksmith deftly picking a lock. However, since the locksmith is a professional, he won’t just use any general one-size-fits-all lock-picking tool; this is because after conducting the scanning stage, the locksmith will know precisely the exact type of specialized tool to use for the job instead of just praying that the one-size-fits-all tool will work. The latter is exactly what script kiddies do — they just spray and pray! The next stage is maintaining access, and it is akin to a stealthy occupant finding ways to remain undetected within the premises. Finally, covering tracks, the last stage, is reminiscent of an expert cleaner erasing all signs of entry, ensuring the system appears untouched.
Professional pentesters and red teams must adhere to these five stages to effectively assess and fortify an organization’s security.
Reconnaissance / Information Gathering
The two types of reconnaissance a penetration tester can perform are:
Passive Reconnaissance: This involves gathering information about the target without directly interacting with their systems or networks. Techniques may include searching public databases, analyzing publicly available resources, or using search engines to gather information about the target organization.
Active Reconnaissance: In this approach, penetration testers directly interact with the target’s systems or networks to collect information. This may involve techniques such as scanning network ranges, querying DNS servers, or sending specially crafted packets to elicit responses from the target systems.
Passive reconnaissance is usually associated with the first stage of ethical hacking, while active reconnaissance is usually associated with the second stage of ethical hacking (scanning and enumeration). Both passive and active reconnaissance play a crucial role in the ethical hacking process, providing valuable insights that inform subsequent stages of the penetration testing process.
I learned how to use many different passive reconnaissance resources — websites, extensions, and tools — that penetration testers use. These resources help you: discover email addresses, subdomains, website technologies, passwords (by cracking hashes), and breached data. To weed out junk data, some of the resources also help you verify valid emails and domains/subdomains. Here are some of the resources I learned how to use:
- Hunter.io — email address finder.
- VoilaNortbert — email address finder.
- Clearbit Connect — email address finder
- EmailHippo — email verification tool.
- Email-Checker — email verification tool.
- Phonebook.cz — multipurpose tool: subdomain finder, email address finder, and URL finder.
- Crt.sh — subdomain finder.
- Tomnomnom’s httprobe — subdomain verification tool.
- BuiltWith.com — website technology identification tool.
- Wappalyzer — website technology identification tool.
- CrackStation — password hash cracker.
- Hashes.com — password hash cracker.
- Breach-Parse — breached data finder.
- DeHashed — breached data finder.
- OWASP Amass — multipurpose tool: performs network mapping of attack surfaces by collecting information from open sources such as DNS records, certificates, web archives, etc. Can be used to discover domains/subdomains, IP addresses, ports, services, etc.
- Burp Suite — multipurpose tool: comprehensive web application penetration testing software. In this part of the course, it is used to identify website technologies and launch brute force attacks.
How can finding email addresses be helpful? An attacker can use the resources listed above to obtain email addresses of a target company’s employees and launch phishing, social engineering, and brute force attacks, as well as search for specific email addresses in data breaches to find any leaked credentials.
How can finding subdomains be helpful? You might find yourself in a situation where you will have a website, example.com, as a target but you can’t find a way to exploit it even after trying every tool and tactic you have. What do you do after this? Give up, right? Of course not. You go and find subdomains, such as subdomain.example.com, and attack them. One of these subdomains might just be your initial entry vector into your target’s system.
How can identifying website technology be helpful? Identifying what technology a website uses can give you valuable information on the website’s attack surfaces and vulnerabilities, which let you to choose the appropriate exploitation tools and techniques.
Kioptrix: The Victim Machine
This is where the real fun begins! The rest of this part of the course involves conducting reconnaissance, scanning and enumeration, and exploitation of a victim machine. The victim machine is called Kioptrix, a vulnerable beginner level penetration testing virtual machine. Since it is a beginner machine, it has tons of different vulnerabilities. This means there’s more than one way to compromise the machine — so keep in mind that the methodology I’ll be showing is just one of many. By the end, I’ll have hacked my first machine ever! This is just the beginning though, because the rest of this course will put even more hacked machines under my belt as they progressively get harder to compromise.
The original Kioptrix machine can be found here on VulnHub, but the one used in this course has been updated and modified because the original one is super outdated. Here is the link to download the updated Kioptrix virtual machine exploited in this part of the course.
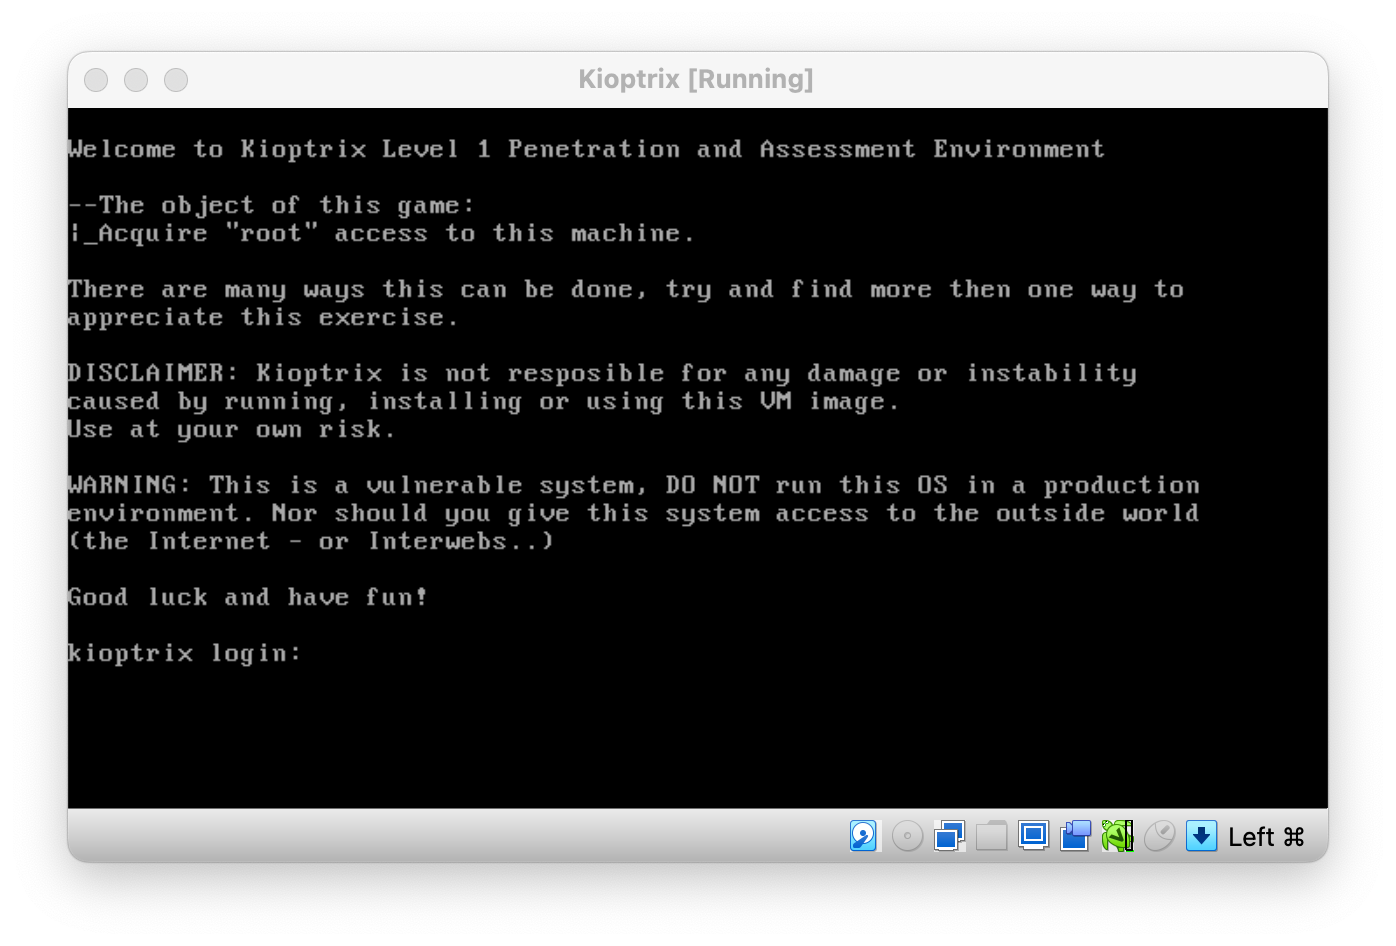
The login screen you see above is what you’ll see after installing Kioptrix.
Scanning and Enumeration
Before you can do anything against this machine, you have to find out what its IP Address is. You can do this various different ways, but here are two of them:
- Simply login to Kioptrix (credentials provided with downloaded files) and use a command like
ip aorifconfig, both which are used to display network interfaces on a system and their associated configuration details, such as IP addresses, MAC addresses, and more. The problem is that Kioptrix doesn’t support these commands. During penetration testing assessments, you will come across situations where certain commands aren’t available to you on some machines and you have to get creative. In this case, the solution is to simply ping your Kali Machine, which shows the IP address of Kioptrix in stdout (standard output). - Run an ARP scan on your Kali machine via the
sudo arp-scan -l. What’s an ARP scan? It’s a type of network scan that is used to discover and map the devices on a local network using the Address Resolution Protocol (ARP). In simple terms, an ARP scan on Kali Linux involves sending a series of ARP requests to all the IP addresses on a local network and then analyzing the responses to determine which IP addresses are currently in use. The ARP scan can be used to identify the IP and MAC addresses of devices on the network.
// Nmap
After finding Kioptrix’s IP address, which in my case is 10.0.2.5 (it might be different for you), the first thing you’re going to want to do is launch an Nmap scan against Kioptrix using this command:
nmap -T4 -p- -A 10.0.2.5
The three flags in this nmap command are -T4 for the timing template, -p- for scanning all ports, and -A for enabling OS detection and version detection. There are 5 timing template flags ranging from T1-T5, and in simple terms, they control the speed at which your scan runs with T1 being the slowest (but capturing more info) and T5 being the fastest (but possibly missing some information).
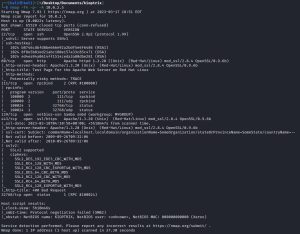
Above, you can see that the results of the Nmap scan returned a lot of information. In order to focus on the most important information, it’s best to filter out the results to identify the most interesting ports, which include: 80 (HTTP), 443 (HTTPS), 139 (SMB), and 22 (SSH). Both port 80 and 443 are interesting targets for hackers because if they’re open, it usually means there’s a website or web app running on those ports. If a hacker is able to exploit a vulnerability in the web server or web application, they may be able to gain unauthorized access to the target machine, steal sensitive data, or launch further attacks against other machines on the network. Port 80 is an especially juicy target for hackers, as it transmits data in plaintext without using encryption. Above, you can see that both of these ports are running an Apache 1.3.20 web server. Nmap also reveals that Kioptrix is running on Red Hat Linux, and that Apache is using mod_ssl 2.8.4 and OpenSSL 0.9.6b. Port 139 is another juicy target, as it uses the notoriously insecure SMB (Server Message Block) protocol, which is commonly used for file and printer sharing between computers on a network. Port 139 is actually SMB’s legacy port. The modern, more secure port for SMB is port 445. Note that in the image, next to port 139, you will see the word “Samba”, which refers to a software suite that enables SMB to run on Linux systems. In the image, under host script results, you can see that Nmap has identified that Kioptrix is running on SMB version 2; however, this doesn’t reveal the exact specific version. Knowing the exact version is important because different versions have different vulnerabilities, so you are going to want to know the exact version when you start researching vulnerabilities. Lastly, although port 22 is not a particularly juicy port since SSH is a relatively secure protocol, I’m labeling it as “interesting” anyways because I’ll be using it later to showcase how to launch brute force attacks.
// Checking 10.0.2.5 on a Browser
Now that you know ports 80/443 are open, the next logical thing is to hop on a web browser, type in 10.0.2.5 into the address bar, and check if there’s any website being served by Kioptrix. This is what shows up:
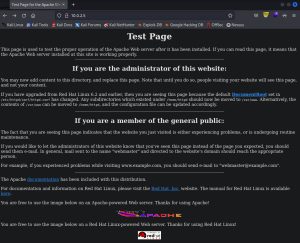

As you can see above, there is a webpage being hosted at 10.0.2.5. The first image above show the default landing page for a website that hasn’t yet been set up. This default landing page reveals some information about Kioptrix: that it runs Red Hat Linux with an Apache server installed on it. I already knew this information thanks to Nmap, but this further confirms it. It’s always good to confirm your findings by using multiple sources. The second image shows a 404 page that you get after clicking on one of the links on the default page. This 404 page confirms another piece of information about Kioptrix: that it’s running Apache 1.3.20.
// Burp Suite
As stated previously, Burp Suite is a comprehensive web app pen testing software multitool. It offers many features that will later be explored in other parts of this course, but for now, I’ll be showcasing its proxy function and how it can be used to gather valuable information on any website. Here is how:
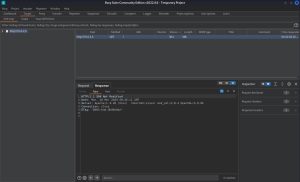
The image you see above is the HTTP response I receive from 10.0.2.5 when I request its webpage. Burp Suite is showing this because I activated its proxy function, which acts as a proxy server by allowing me to intercept, analyze, and modify HTTP/HTTPS traffic between my browser and any website I visit. Once the proxy is turned on, you simply visit the website you want to gather information on, and Burp Suite will intercept the traffic for you, which you can then analyze and modify. As you can see from the image, the HTTP response discloses valuable information about Kioptrix. The response further confirms what I already knew: that it’s running Apache 1.3.20, Red Hat Linux, mod_ssl 2.8.4, and Open SSL 0.9.6b. Since this is just a basic default landing page, there isn’t much more that the HTTP response reveals. However, if you use this Burp Suite function on public websites on the internet, like tesla.com, you will see a ton more information in the HTTP response.
// Vulnerability Scanners: Nikto & Nessus
At this point, it’s time to pull out some more scanners to identify any possible vulnerabilities. I’ll be showcasing two vulnerability scanners: Nikto and Nessus.
// Nikto
The first scanner I’ll be showcasing is Nikto, an open-source command line web server scanner that is used to identify vulnerabilities in web servers and applications. It can detect over 6700 potentially dangerous files and scripts on web servers, including outdated software, misconfigurations, and common web application vulnerabilities. Nikto also has the ability to perform various types of web server and application tests, such as server banner grabbing and CGI scanning.
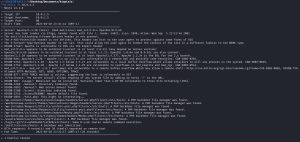
The image above is the output showing the full results of a Nikto scan against 10.0.2.5. As you can see, it reveals a trove of information about the potential vulnerabilities that Kioptrix may have. It also confirms, yet again, what I already knew about Kioptrix: that it’s running Apache 1.3.20, Red Hat Linux, mod_ssl 2.8.4, and Open SSL 0.9.6b. As stated earlier, there is more than one way to compromise this machine. As such, one could spend a lot of time researching all of the vulnerabilities from the Nikto results to pursue multiple attack vectors. However, I will be focusing on just one of the results shown above: mod_ssl 2.8.7 and lower are vulnerable to a remote buffer overflow which may allow a remote shell. Since Kioptrix is running mod_ssl 2.8.4, this seems like an attack vector worth researching.
// Nessus
Nessus is another popular vulnerability scanner that is used to identify vulnerabilities in networks, servers, and applications. It can scan for thousands of different vulnerabilities across multiple platforms and operating systems, including web applications, databases, and network devices. Nessus also offers a variety of scanning options, including authenticated scans, unauthenticated scans, and policy compliance scans. It has a user-friendly web interface that provides detailed vulnerability reports and remediation recommendations to help organizations quickly address security issues. Additionally, Nessus is highly customizable, allowing users to create custom policies and scan templates to suit their specific needs.

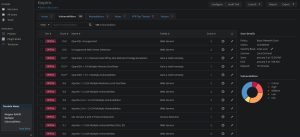
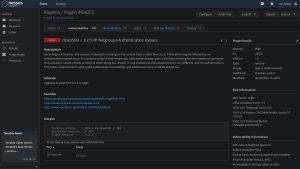
The three images you see above are what Nessus returns after running a scan against 10.0.2.5. The first image displays a pie chart depicting the distribution of vulnerabilities found in Kioptrix according to their severity levels. As you can see, Kioptrix is riddled with critical (20), high (33), and medium (59) vulnerabilities. This is perfect for a beginner, as it allows the exploration of multiple different attack vectors. The second image shows a list of all the vulnerabilities, sorted by the most severe at the top of the list. The third image shows a description of one of the vulnerabilities after clicking on it; however, this isn’t one of the vulnerabilities I’ll be exploiting, I simply included this image to show you what Nessus looks like. As mentioned earlier, I’ll be focusing on the mod_ssl vulnerability, but I’ll also be abusing one other vulnerability related to SMB.
// Enumerating SMB with Metasploit
Remember that earlier, Nmap couldn’t quite tell what specific version of SMB Kioptrix was running — it only gave the general version (2). A different tool can be used to enumerate the specific version of SMB: Metasploit.
Metasploit is an open-source penetration testing framework that provides a wide range of tools and modules for conducting security assessments, vulnerability testing, and exploiting vulnerabilities in systems and applications. It includes a variety of scanners that can be used to identify vulnerabilities in target systems. These scanners include both active and passive scanners. Passive scanners monitor network traffic to identify potential vulnerabilities, while active scanners actively probe target systems to identify specific vulnerabilities. One of these scanners is used for SMB version detection, which can identify the specific version of SMB that is running on a target system. Let me show you how to use this Metasploit SMB scanner module:
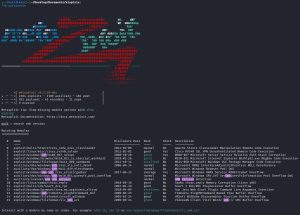
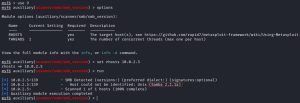
The first image above is what you will see when you first boot up Metasploit via the command line with the msfconsole command. The ASCII art shown will be different with every boot, which is a cool touch. After launching Metasploit, I used the search smb version command to search for anything that might help me enumerate SMB. As you can see, Metapsloit returned back 15 different results, which are all modules, with a short description for each. You can tell some of these results are exploits because their names start with “exploit/…”. Other results start with “auxiliary/…”, which are other type of modules like scanners. I could simply try these exploits right off the bat and see if they work — just spray and pray! However, I won’t be doing that because this course isn’t meant to produce script kiddies — it’s meant to produce professional ethical hackers that follow a methodology. From the list of results, it seems like result #9 (SMB Version Detection) is what I’m looking for, so that’s exactly what I’ll use.
The second image above shows how to use the SMB version detection module I found. It’s as simple as entering use 9 into the command line. After entering that command, you will notice that the Metasploit prompt changes to include red-colored text to indicate that the module has been successfully loaded and that it’s now ready for use. After loading up any module, it’s best practice to use the options command first to see what options are available, some of which must be set before using the module. Options are kind of like command parameters, flags, or variables. As you can see, this module only includes 2 options, which are both required. The THREADS options is already initially set to use 1 thread, but the RHOSTS option isn’t initially set. RHOSTS is the IP address(es) of your target(s). As you can see, I used the set rhosts 10.0.2.5 command to set the RHOSTS to 10.0.2.5. After doing this, I simply used the run command to launch the scanner. As you can see from the image, the scanner revealed the exact SMB version that Kioptrix is running — SMB version 2.2.1.
Researching Exploits
As stated previously, this Kioptrix box has many different vulnerabilities, so you could end up doing tons of research on the many vulnerabilities it has in order to exploit the machine. However, I will only be showcasing two different exploits. Those two exploits are related to the information gathered earlier about Kioptrix: that it’s running mod_ssl 2.8.4 and SMB 2.2.1. With this information, I can start doing vulnerability research. It’s important to note that the two exploits I will showcase are very easy to find and execute to compromise Kioptrix. This is because Kioptrix is a beginner penetration testing box. Non-beginner boxes are not so easy to compromise. The purpose of this box is to expose students to the methodology, tools, and thought processes used in ethical hacking.
// Finding SMB 2.2.1 Exploits
As shown earlier, I confirmed that Kioptrix is running SMB version 2.2.1 via Samba. Researching exploits is as simple as Googling “SMB 2.2.1 exploit”. After doing that, I came upon this link from Rapid7: Samba trans2open Overflow (Linux x86). The page describes a buffer overflow exploit that affects Samba versions 2.2.0 to 2.2.8. As an aside: as stated earlier, Samba is a software suite that allows the SMB protocol to run on Linux systems; they are technically two different things, but Samba and SMB are often used interchangeably, even though it may not be technically accurate to do so. That being said, I will be using the terms interchangeably since many of the sources I found also use the term interchangeably. Anyways, the Rapid7 link also explains that the exploit does not affect versions of Red Hat Linux that “do not allow anonymous access to IPC”.
What is IPC? IPC (Inter-Process Communication) refers to a mechanism that allows processes to communicate with each other on a network. IPC in Samba provides a set of services that allow clients to interact with Samba daemons for tasks such as authentication and browsing file shares. Anonymous access to IPC means that a user can access the IPC services without being authenticated or without providing any credentials. This is often used by default in older versions of Samba and can be a security risk, as it allows attackers to potentially exploit vulnerabilities in the IPC services. How can you find out if Kioptrix has anonymous IPC access enabled? By simply running the smbclient -L //10.0.2.5 command, which uses the smbclient utility to connect to SMB file shares on Kioptrix while the -L flag lists out the available file shares. After running this command, you will immediately know if anonymous IPC access is enabled if the stdout spits back this message: Anonymous login successful. That’s exactly what Kioptrix shows, so it definitely has anonymous IPC access enabled, meaning the exploit I found will most likely work.
Another way to research exploits is to use SearchSploit, which is a command-line utility for searching and identifying exploits and vulnerabilities. SearchSploit is part of the Exploit Database, which is a collection of exploits and vulnerability data maintained by Offensive Security. Here’s how you can use SearchSploit:

As you can see from the image above, SearchSploit further confirms that there is a trans2open buffer overflow exploit that affects Samba (SMB) version 2.2.X, which Kioptrix seems to be vulnerable to since it’s running SMB 2.2.1.
// Finding mod_ssl 2.8.4 Exploits
It’s now time to research vulnerabilities for mod_ssl 2.8.4. Just like before, it’s as easy as Googling “mod_ssl 2.8.4 exploit”, which shows this page as one of the top results: Apache mod_ssl < 2.8.7 OpenSSL – ‘OpenFuckV2.c’ Remote Buffer Overflow (1). The title of the page reveals that the exploit affects Apache servers running mod_ssl with versions less than 2.8.7, which means Kioptrix is most likely affected. The exploit on this page, however, doesn’t work because it’s outdated and no longer working for a variety of reasons. That’s okay though, because the Google search results shows that there exists an updated version of the exploit on GitHub: OpenLuck.
Exploitation Basics
The time has come! I’ve done my reconnaissance, scanning and enumeration, and vulnerability research. It is time for me to finally pop my first shell. Note that popping a shell means successfully obtaining a shell on your attack machine that gives you remote access to your victim’s computer. However, before that, I must explain two important concepts: 1) reverse shells vs. bind shells and 2) non-staged vs. staged payloads.
// Reverse Shells vs. Bind Shells
Both reverse shells and bind shells are techniques used in network communication to establish remote access to a computer system. They’re also used by hackers to gain remote access to a target system.
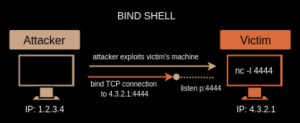
A bind shell is a type of shell that listens for incoming connections on a specific port and waits for a client to connect to it. Once a connection is established, the shell is bound to the client and the client can send commands to the server. In the bind shell image above, you can see that the victim machine (4.3.2.1) is using the nc -l 4444 command, which uses the Netcat networking utility, to listen on port 4444 for any incoming connections. The attacker (1.2.3.4) then gains a shell, giving him remote access the victim machine, by connecting to 4.3.2.1 via port 4444.
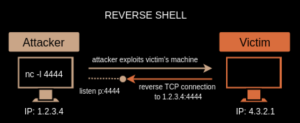
On the other hand, a reverse shell is a type of shell that connects back to a remote host, rather than listening for incoming connections. In this case, it is the remote host that is listening for an incoming connection on a specific port. Once the server reaches out and connects to the remote host via the specific port, the remote host gains a shell with remote access to the server. In the reverse shell image above, it is the attacker, instead of the victim, that is using the nc -l 4444 command to listen for any incoming connections on port 4444. The attacker can then leverage a vulnerability on the victim machine to force it to connect to the attacker’s machine via port 4444, after which the attacker gains a remote shell that gives him remote access to victim machine.
In general, a bind shell is easier to detect and block by firewalls and intrusion detection systems, as it requires the server to be listening on a specific port. A reverse shell, on the other hand, is often used by attackers to bypass such security measures, as it establishes a connection from the inside of the target network to the attacker’s system, which is usually allowed by firewalls.
// Non-staged vs. Staged Payloads
In the context of malware, a “payload” refers to the part of the malware code that is designed to cause harm to the infected system or to the user’s data. Malware typically consists of two main components: the “delivery mechanism” and the “payload”. The delivery mechanism is the code that allows the malware to infect a system, while the payload is the code that is executed once the system is infected.
A “non-staged payload” and a “staged payload” refer to two different approaches for delivering the malicious payload to the target system.
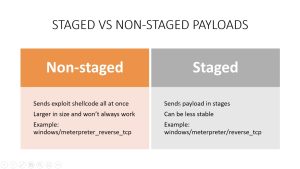
A non-staged payload is a type of malware that delivers its entire malicious payload in a single step. When a non-staged payload is executed, it immediately carries out its malicious activity on the infected system, such as stealing sensitive data, encrypting files, or installing additional malware.
On the other hand, a staged payload is a type of malware that delivers its payload in multiple stages or steps. In this approach, the initial malware code that is delivered to the target system is relatively small and simple, with the main purpose of downloading and executing additional malware components. These additional components, which make up the main payload, are typically more complex and sophisticated and can carry out more advanced malicious activities.
// Trans2open Exploit
The Rapid7 link I found earlier, during the vulnerability research stage, includes instructions on how to use the trans2open exploit from within Metasploit. Here’s how:
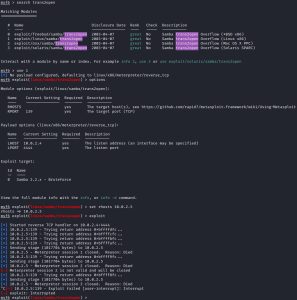
I first boot up Metasploit and searched for “trans2open”, which gives me 4 results for the exploit corresponding to 4 different target operating systems. Thanks to the reconnaissance, scanning, and enumeration I did against Kioptrix, I know I must use 1 because I know that Kioptrix is running on a Linux machine. After loading up the exploit module, I check options to find that I need to set rhosts 10.0.2.5, after which I then exploit Kioptrix. There’s 1 problem, though… nothing is happening! After running the exploit, as you can see from the image above, all Meterpreter sessions keep closing because Reason: Died. What does this even mean? Let me break down what’s happening:
Meterpreter is a post-exploitation tool that is part of Metasploit; you can think of it as like a type of special shell that you can get in Metasploit after compromising a machine. However, Meterpreter is more than just a simple shell. It is a post-exploitation tool that provides additional capabilities beyond what a traditional shell would offer. For example, Meterpreter allows the attacker to interact with the file system, upload and download files, capture screenshots, and inject arbitrary code into the compromised system’s memory. Additionally, Meterpreter is designed to operate in a stealthy and memory-resident manner, which makes it more difficult to detect and remove than a traditional shell.
So what’s happening here is that the shells that I keep getting immediately die upon being spawned, which doesn’t give me any chance to access Kioptrix remotely. The exploit keeps on trying to spawn a permanent shell over and over again after each short-lived shell dies, without any success. Why is this happening?
This is happening because, if you look at the stdout that appears after I used the use 1 command, it says: [*] No payload configured, defaulting to linux/x86/meterpreter/reverse_tcp, which means the default payload used is a staged payload, as indicated by meterpreter/reverse_tcp (notice the use of the forward slash “/”). A non-staged payload would look something like this: linux/x86/meterpreter_reverse_tcp (without a forward slash “/” in the last part). To fix what’s happening, I just need to set the exploit to use a non-staged payload, like this:
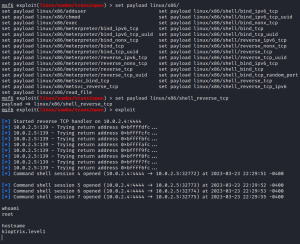
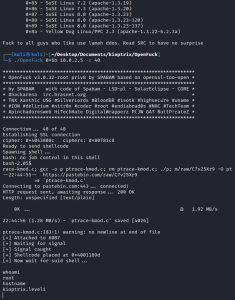
After typing set payload linux/x86/, I hit double-tab to reveal my payload options. As you can see from the options, none of the non-staged payloads use Meterpreter, so I’ll have to settle with a non-staged payload that uses a normal shell. I end up using the shell_reverse_tcp non-staged payload by using the set payload linux/x86/shell_reverse_tcp command, which ends up giving me a shell. To prove that I gained a shell, you can see I ran the whoami command which returned root, meaning I now completely own the machine. To prove this is the Kioptrix machine, I ran the hostname command which returned kioptrix.level1.
That concludes how I popped my first shell ever.
// OpenFuck/OpenLuck Exploit (Manual)
As you saw, Metasploit automates the process of exploitation to a scary degree of ease. However, there are times where an exploit won’t be available within Metasploit, in which case you are going to have to resort to using manual exploits. This means downloading the malicious source code and running it right from the terminal, instead of the Metasploit console. Remember that when researching mod_ssl 2.8.4 exploits, I came across an exploit called OpenFuck, which doesn’t work, and an updated version called OpenLuck, which does work. They are the same exploit, except OpenLuck is updated to work on modern systems. Using the updated OpenLuck version, I will now demonstrate how you can use exploits manually:
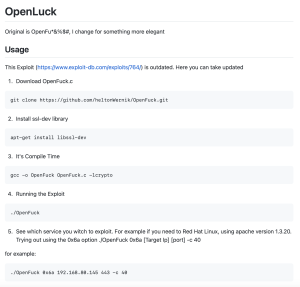
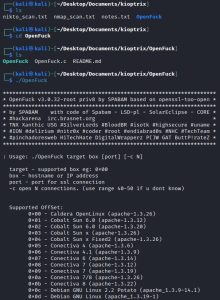

The first image above shows the instructions that can be found in the OpenLuck GitHub link. They are pretty straight forward, and as you can see from the image, it even tells you the exact command you need to run in order to launch the exploit.
The second image shows the stdout you get after following the instructions and executing ./OpenFuck. As you can see, the stdout gives more information on how to run the exploit. It gives a list of offsets, one of which matches the Apache version that Kioptrix is running. Since I’ve been a good enumerator, I know that Kioptrix is running Red Hat Linux and Apache 1.3.20, which narrow down my selection of offsets to just two: 0x6a and 0x6b.
The third image shows the best offset from the two choices (0x6a and 0x6b) that will work on Kioptrix. The 0x6a offset works too, but it’s not the best option because it’s less stable which causes it to work successfully less often.
Lastly, the final image from above shows the exploit being launched via the ./OpenFuck 0x6b 10.0.2.5 -c 40 command, resulting in a successful compromise of Kioptrix as shown by the output of the whoami and hostname commands.
// Brute Forcing SSH
There is another way I could have tried breaking into Kioptrix: via port 22. However, port 22 is a relatively secure port, so the chances of exploiting it on any system through some vulnerability are slim. The only thing you can really do against SSH is brute forcing it. The teacher for this course tried this against Kioptrix on his own free time, but he said nothing came of it. Nonetheless, I will now showcase how to launch brute force attacks against port 22.
Although port 22 may not be as juicy as other ports, it is still important to at least try brute forcing it during professional pentesting assessments. There are two reasons for this: testing password strength and testing blue team detection capabilities. If your client is using default or weak passwords, they will be broken by brute forcing tools. As it relates to blue teams, they should be able to detect you when performing brute force attacks. During pentest assessments you want to be “as loud as possible”, meaning your activities should aim to alert the blue team to test out their detection capabilities. Brute force attacks are a good way to do that. As an aside, it’s worth noting that red teams assessments aim to be stealthy rather than “as loud as possible”.
I will be using two tools for this demonstration: Medusa and Metasploit.
Medusa is a fast, parallel, and modular login brute-forcer designed for penetration testing and security auditing, supporting a wide range of protocols and services such as SSH, FTP, HTTP, and SMB. Note that this course uses a different but similar tool called Hydra, but I keep getting a key exchange (kex) algorithm mismatch error when I use it, which is why I’m using Medusa instead.
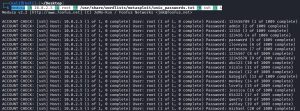
Launching a brute force attack against SSH is as simple as using the command shown above: medusa -h 10.0.2.5 -u root -P /usr/share/wordlists/metasploit/unix_passwords.txt -M ssh -t 4. Here’s a breakdown of the flags:
-h— sets a target host, 10.0.2.5 in this case.-u— sets a username, in this case ‘root’. Every login attempt will use this username, but with a different password each time.-P— sets the password wordlist, in this case /usr/share/wordlists/metasploit/unix_passwords.txt. This list contains all of the passwords that will be used during login attempts. Password wordlists consist of weak, common, or leaked passwords.-M— defines the module to use, which is SSH in this case.-t— sets the number of threads, in this case four. The more threads used, the higher likelihood of being detected by a blue team.
As you can see from the screenshot, Medusa goes through each password in the unix_passwords.txt wordlist during login attempts, while keeping the username ‘root’ as a constant. The screenshot only shows 20 out of 1009 attempts.
Now I will showcase how to use Metasploit to do the same thing using this Metasploit module: auxiliary/scanner/ssh/ssh_login.
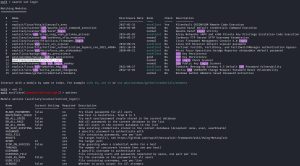
In the first screenshot above, I use the search ssh login command to find a module that can brute force SSH. As you can see, 15 results are returned. Result #11 corresponds to what I’m looking for, thus I use use 11 to load up the module and then use options to check out the options available to me.
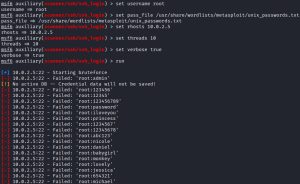
In the second screenshot above, I set the username, password wordlist, target IP address, threads, enable verbosity for more detailed output, and run the brute force attack. As you can see, it does the same thing as Medusa: for every login attempt, it tries a combination of ‘root:password’, using a different password from the wordlist while keeping the username constant.
// Credential Stuffing + Password Spraying
Although these next two attacks were not used against Kioptrix, I will now showcase credential stuffing and password spraying, which are two types of password attacks. Credential stuffing involves taking a list of credentials, usually from publicly leaked data breaches, and using them in an attempt to gain account access. Password spraying involves taking a list of known usernames, usually from publicly leaked data breaches as well, and using them in combination with any one single guessed password (usually a weak/default/common password) at a time to gain account access.
This demonstration will use Burp Suite to target Tesla.com using publicly available breached Tesla credentials gathered from Breach-Parse. Note that this demonstration will use screenshots straight from the course rather than my own work, since launching attacks against Tesla might get me in trouble. To be clear: TCM Security is not doing anything illegal either, because at the time of the course’s recording, Tesla was participating in a bug bounty program that allowed anyone to target their page. However, this could have changed since then, which is why I am choosing not to launch these attacks myself. Do not launch these attacks against any organization unless you’re authorized to do so.
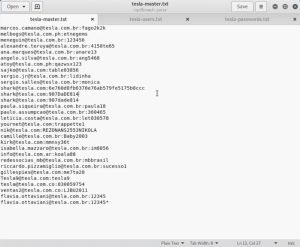
The image above shows the breached credentials used in this demonstration. The image contains 3 text files. The first file is tesla-master.txt, which is the master list containing the breached credentials. The second file, tesla-users.txt, contains only the usernames from the master list. The third file, tesla-passwords.txt, contains only the passwords from the master list.
I will now demonstrate credential stuffing.
To launch a credential stuffing attack, you’re going to want to start by launching Burp Suite’s proxy function and then navigating to Tesla.com’s login page on a browser. At the login page, enter any fake credentials like “username:password” and hit enter. Burp Suite’s proxy will then capture the traffic, as shown here:
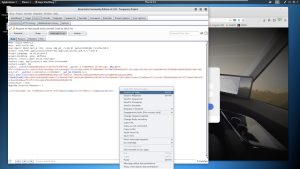
As you can see, the traffic has been captured. After capturing the traffic, right click on it and then send it to Burp Suite’s intruder. Then navigate to intruder, which should look something like this:
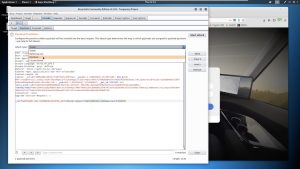
When you first see the intruder, you will see a lot more highlighted green portions of the traffic than what is shown above. You want to clear those green highlights by clicking ‘clear’ under ‘start attack’. Next, you want to highlight the username and password fields, as shown in the image, and then click ‘add’, which will essentially add these fields as parameters when launching the attack. Then, change the attack type to ‘pitchfork’, as shown in the image. These parameters must now be loaded up with payloads:
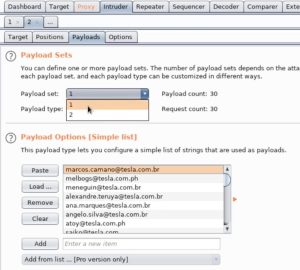
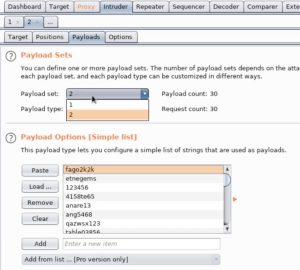
As shown above, payload 1 contains all the usernames from tesla-users.txt which were copied and pasted there. Likewise, the passwords from tesla-passwords.txt were copied and pasted into payload 2. The only thing left now is to run the attack:
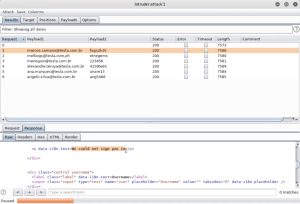
That is what you’ll see after running the attack, although in this case the attack was intentionally paused which is why you don’t see a full list of the credentials used. As you can see: the first username in payload 1 is used in combination with the first password in payload 2, followed by the second username in payload 1 in combination with the second password in payload 2, etc. To determine if any credentials worked, you should inspect any changes in the status or length of the request. For example, if all of the requests show a 200 status but then you see an outlier of 301, that might be indicative of a successful login. If any request length is significantly larger or smaller than the average, that might also indicate a successful login. Another way to identify a successful login is to look at the raw request, copy and paste the standard error message for unsuccessful logins (in this case: “We could not sign you in.”), and then feed that into Burp Suite’s grep function which adds the string as a filter. This lets you easily filter out unsuccessful logins, as such:

As you can see, the string was added as a filter which can easily let you differentiate unsuccessful vs. successful logins. You can also click on the filter to automatically sort the requests to include only successful logins at the top of the results.
I will now demonstrate password spraying.
The initial steps to launch a password spraying attack are the exact same as credential stuffing, with some small changes: at the intruder screen, make sure to select only the username field as the sole parameter, change the attack type to ‘sniper’, and add any weak/default/common password you want in the password field. Your screen should look something like this:
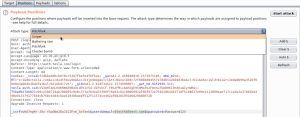
In this example, the common password ‘Password123’ was used. Since you only have 1 parameter, you will only load up 1 payload. Just as before, the contents of tesla-users.txt were copied and pasted into this payload before running the attack. Lastly, running the attack will look something like this:
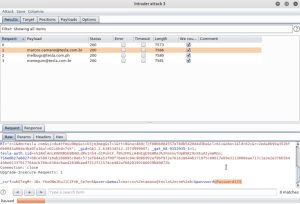
It’s worth noting that as a professional pentester, if you fire 10 or so of these attacks in a row you might cause an unwanted Denial of Service attack against your client’s employees — something they definitely don’t want! This is because your client might have a lockout policy that automatically locks out users after a certain number of failed login attempts. To avoid this, ask your client what their specific lockout policy is and then proceed from there. For example, if their lockout policy locks out users after 5 failed login attempts every hour, then you should launch 4 of these attacks every hour to avoid locking out your client’s employees.
{$}
<contact_me>
Fill out the form below to reach out to me!